Help Guide
- Band Refer to items with this icon about the band
- Head Refer to items with this icon about the genuine head
- Table of Contents
-
-
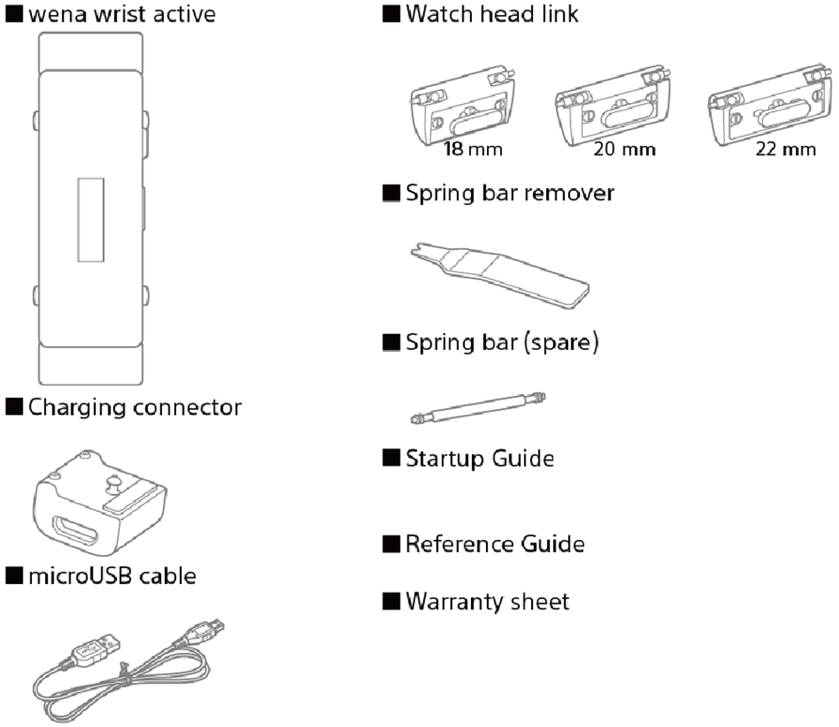
- Check the supplied items.
- If there are any missing items, please contact to Sony Support team.

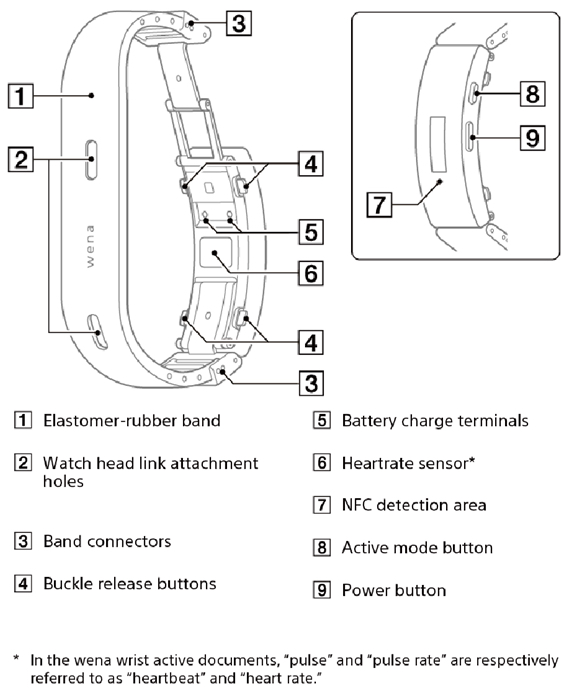
- Names of parts
-
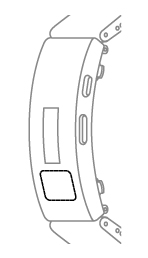
- Names of band parts

- Names of band parts
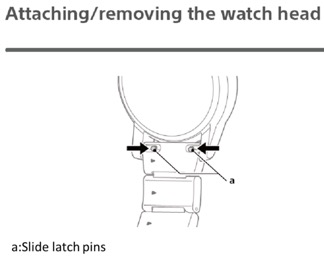
- Attaching/removing the watch head
-
- Note
Sony does not accept any responsibility for any damage that you may cause to your own watch head* For the warranty terms of the manufacturer of your wrist watch, please directly contact the manufacturer on your own.
- Note
Before you start
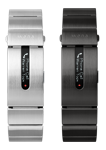
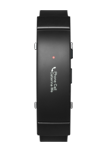
- Your wena wrist pro
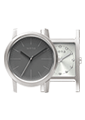
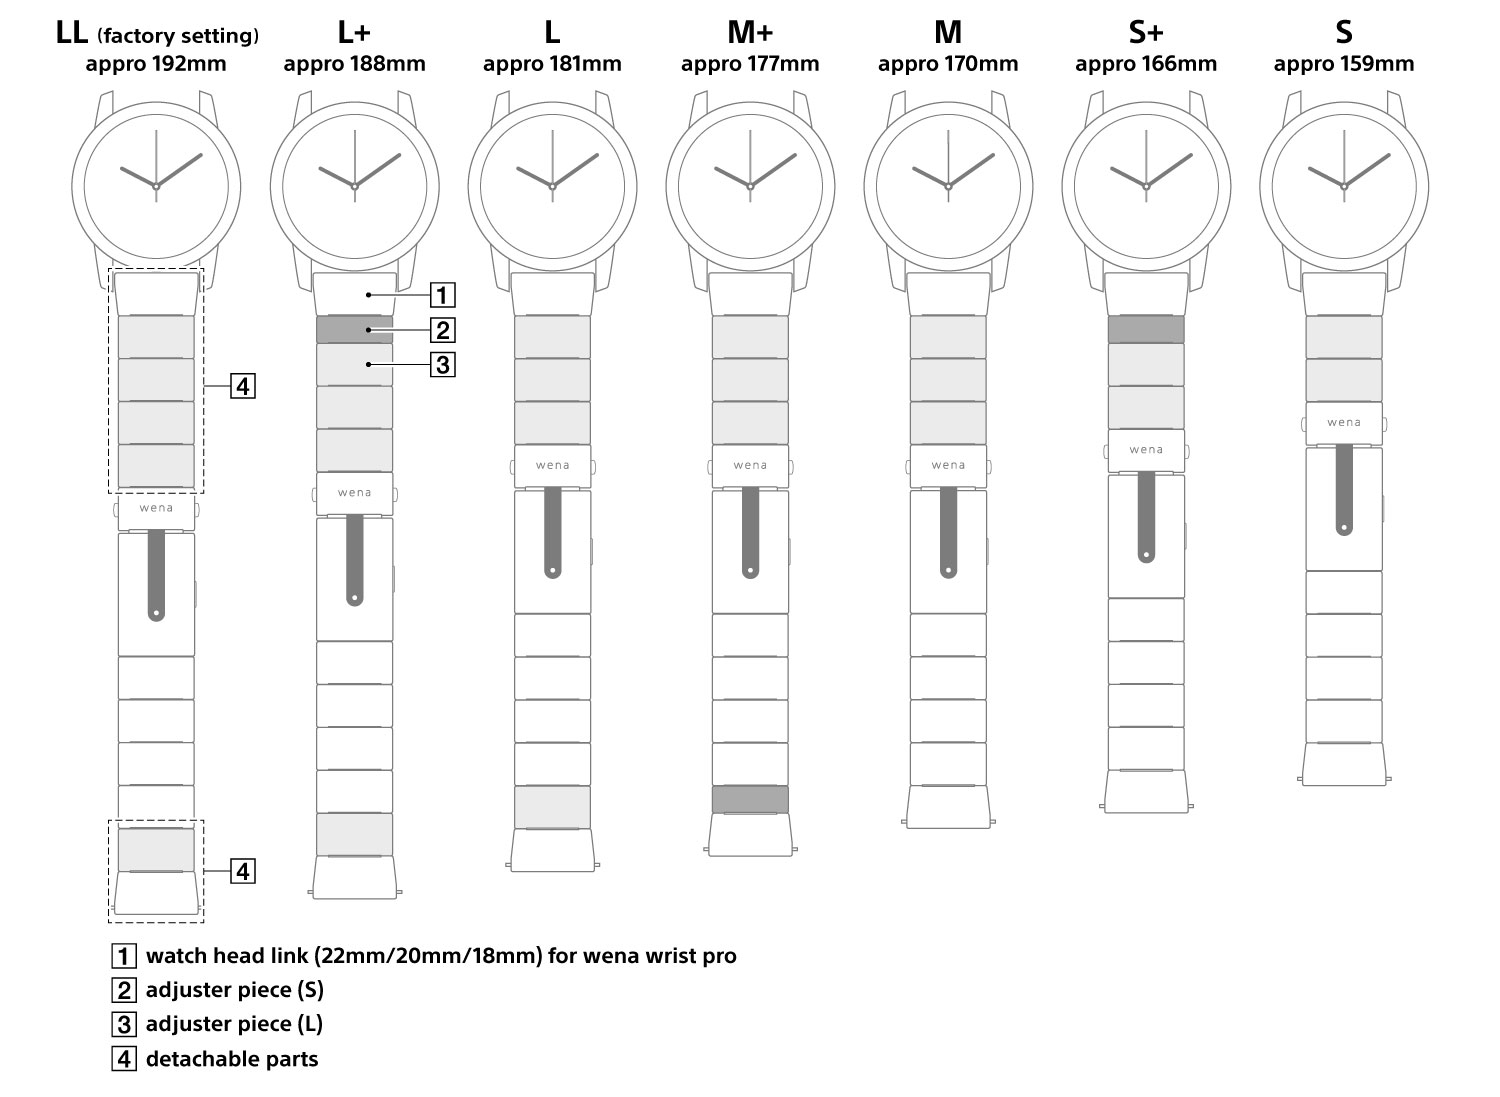
- The supplied adjuster piece and attachment parts / watch head links
- Reference Guide
Note
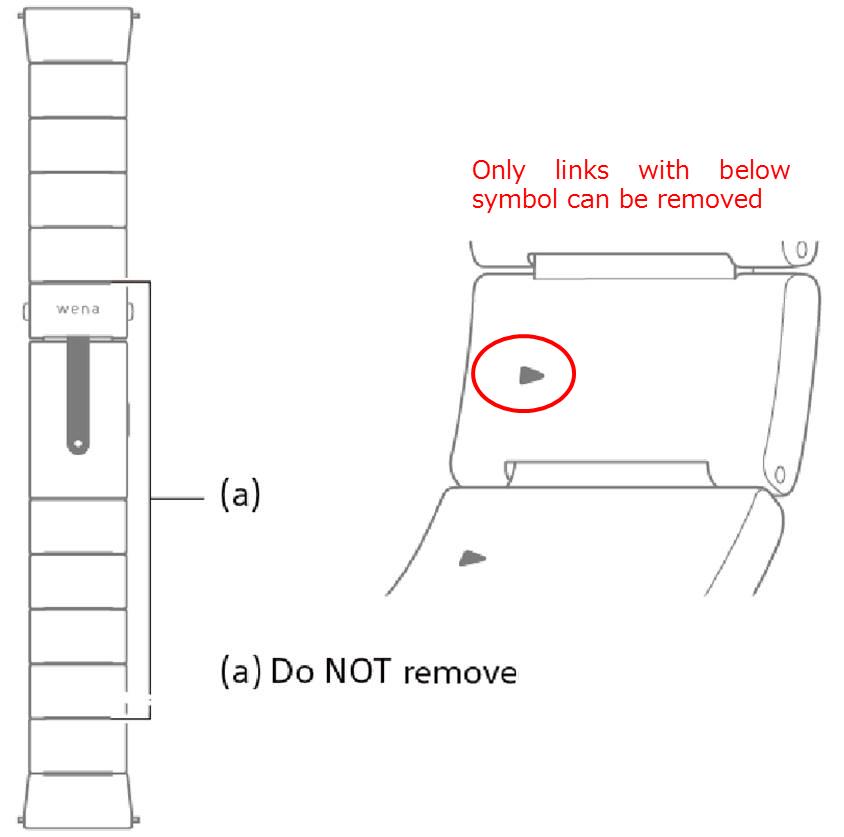
The size of the band can be reduced by 11mm for each link removed. Included in the box is a smaller 7mm adjuster link that allows for finer adjustment.
If required, additional large and small adjustment links can be purchased separately.
The lengths of sizes stated below are examples when attaching the wena wrist head Three Hands model (WNW-HWT01). The length may differ depending on the head ,watch head linkwatch head link, or lug you are attaching.
if a wena watch head is being attached to the wena band
- The wena band and wena watch faces are designed to fit together, the band is fitted with a 22mm lug attachment out of the box, matching the wena faces
If a different watch head (non wena) is being attached
For watch heads requiring a 22mm connection, the wena band should not need to be adjusted to fit the watch head.
For watch heads requiring an 18mm or 20mm connection, the watch head links on the wena band will need to be changed to an 18mm or 20mm lug attachment (these are both provided in the box and also available to purchase separately).
It is not possible to connect a watch head to the wena band if it does not fit an 18mm, 20mm or 22mm watch head link.
We recommend that you ask a watch shop or Jewellers to make any required adjustments for you.
Getting it ready
Clip on the charging clip to the band, and connect the micro-USB cable.
When the clip is connected correctly the band should start charging. You should feel a small vibration and a small red light will appear on the band’s display.
If it is not connected properly try adjusting the clip until it clips into place.
When using this device for the first time, you need to pair it with your smartphone using Bluetooth®.
You should normally be prompted to do this when you set up your wena wrist for the first time with the wena App
Follow the instructions below.
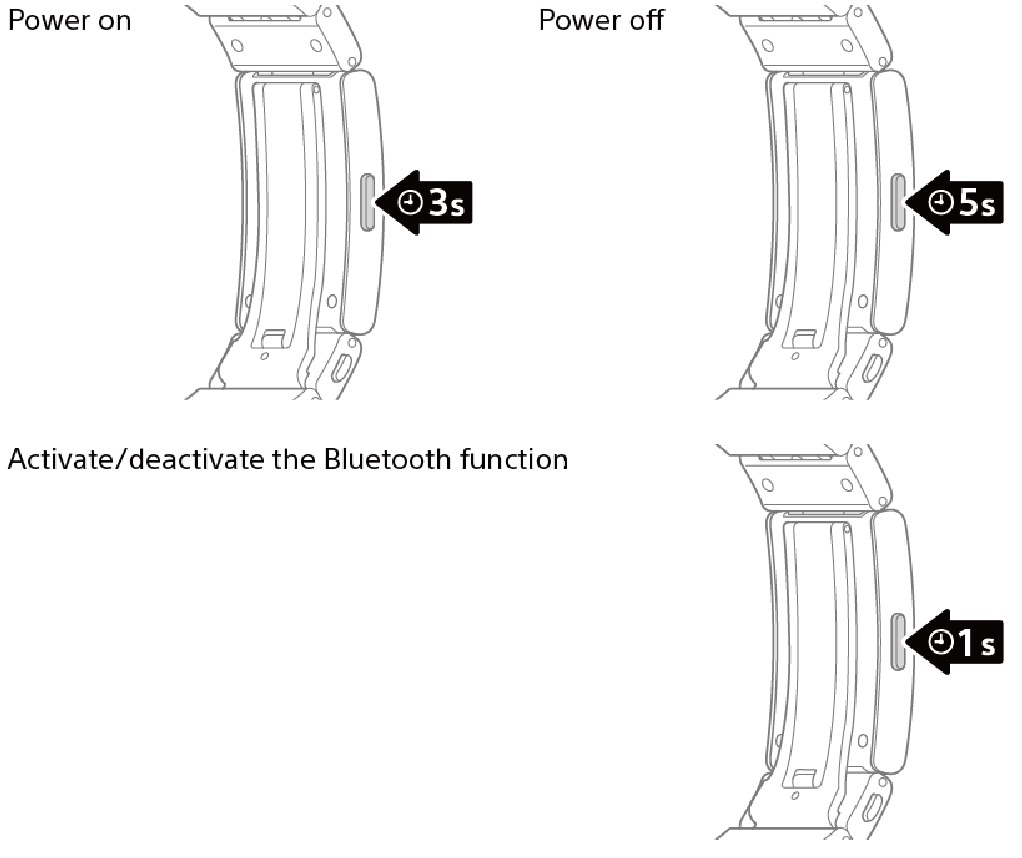
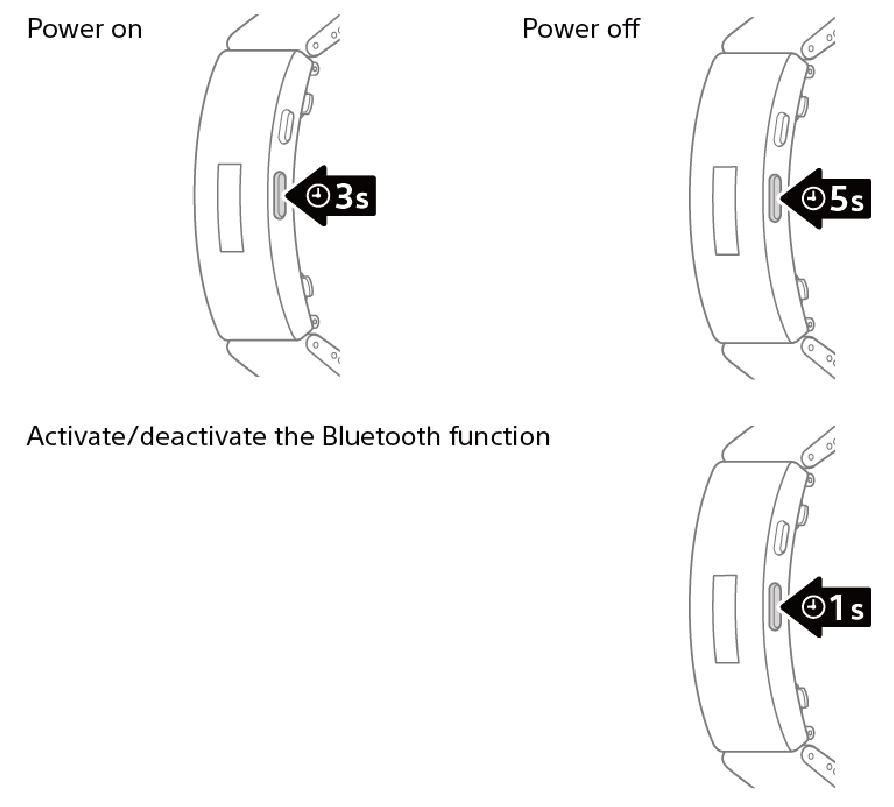
- Push and hold the power button for approximately 3 seconds to turn the device on. “Power on” will appear on the display window and you will feel a short vibration. Release the button as soon as the “Power on” message appears.
- On your smartphone ensure Bluetooth is turned on and search for this device (WB-11B) in available bluetooth devices Tap on (WB-11B)..
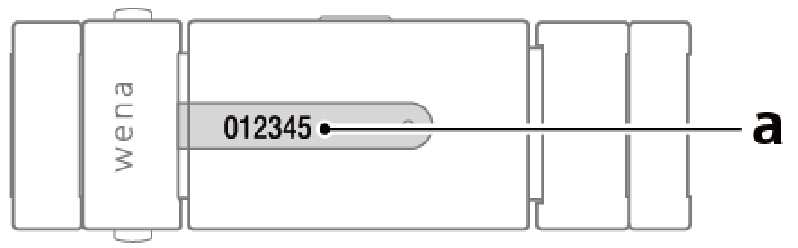
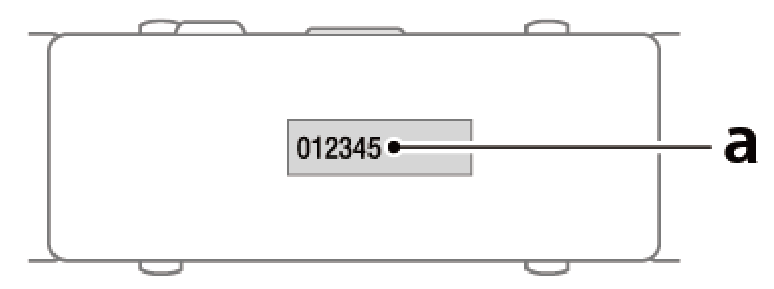
- Input the 6-digit pass key that appears on the device’s display window(a).
“Pairing successful” will appear on the device’s display window.
If you enter the wrong pass key or cancel the process, you will return to pairing standby mode.
- Tips
If Bluetooth on your device turns off, simply press the button for approximately 1 second until you feel a vibration and the wena device screen shows ‘connected’
If you keep your wena device close to your phone it should stay connected.
If your wena device is separated (disconnected) from your phone, when your phone is in range of your wena device again, by default the wena device will automatically try and connect to your phone again
If you have issues with connection please try turning Bluetooth off and then on again on your smart phone and wena device and then retry.
Before You Start
Please ensure
- That you have registered an account and are logged into the account on your wena App.
- You wena device is connected to your smartphone and wena App.
- Your smartphone is connected to a mobile network or wi-fi network.
- You are wearing your wena device with the clasp closed around your wrist.
- You have a valid card for use with wena pay.
- Step 1
From the wena mobile app, select [Settings] > [wena pay] - Step 2
Please review and accept the terms presented to proceed.
- Step 3
Set a 4 digits PIN and confirm same PIN again (you will need this pin to access the wena pay menu in the future)
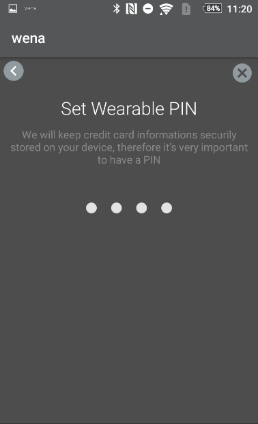
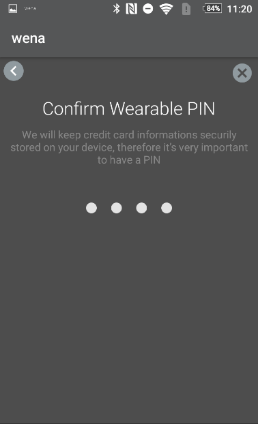
You can now add a card to the wena pay app
- Step 1
From the wena mobile app, select [Settings] > [wena pay] - Step 2
Enter the registered 4-digit PIN code. - Step 3
It is only possible to add certain cards to the wena pay service, please see here for the cards that can be registered.
Select [ADD CARD] to register your credit card information (Scan your card with the camera, or manually input it)
Select [ADD CARD] again
After a few seconds the terms and conditions of your credit card provider should appear. - Step 4
Read and agree to the Terms and conditions.
A confirmation should then appear to confirm that your card has been added successfully. Please confirm with OK and an image of your card should now be displayed. - Step 5
In some cases, your bank may require additional verification.
If you see ‘Verification Required’ below the image of your card
Select [SMS to ****]. This will send a text message to your phone with an activation code. Once you receive the activation code from your bank, enter the code on the screen.
A confirmation should then appear to confirm that your card has been activated successfully.
To authorise your device for payment you may need to exit wena pay and then enter your pin code again. Once done you should see the wena pay option on your wena device (press the button on the wena device until it appears).
- Step 1
From the wena mobile app, select [Settings] > [wena pay] - Step 2
Enter the registered 4-digit PIN code. - Step 3
Select […] on upper-right corner on the card
If you select [suspend], you can suspend your card, you will then and see a [SUSPENDED] icon on the card
If you select [Remove], you can delete your card from wena pay.
If you have multiple cards in wena pay, please set a default or primary card for making payments.
To authorise wena device to make payments take the following steps:
- Step 1
From the wena mobile app, select [Settings] > [wena pay] - Step 2
Enter the registered 4-digit PIN code. - Step 3
Push the power key on your wena wrist several times to see ,
then release the power key and the following symbol
,
then release the power key and the following symbol  should appeard
 - Step 4
Within 60 seconds, hold your wena wrist on the payment reader.
The watch vibrates and displays a check mark when it is finished communicating with the reader and payment is confirmed.


- Step 1
Select [Settings] > [wena pay] - Step 2
Input the registered 4-digit PIN code. - Step 3
Select [Add card] to register your credit card information (Scan your card with the camera, or manually input it) - Step 4
Read and agree to the Terms and conditions. - Step 5
Complete card registration - Note
If you wish to temporarily stop use of the card, select [Suspend].
- Device modes
Device connected (Bluetooth on):the Bluetooth mark will show in the display window.
Standby mode (Bluetooth on): LED flashes in white colour.
Bluetooth off: Bluetooth mark is not displayed, and the LED does not flash.
*When Bluetooth is off, the notification function cannot be used. - To reconnect
*When the paired smartphone (with Bluetooth turned on) is brought near to the wena device, it will automatically reconnect.
*If Bluetooth of wena wrist is off, press and hold the power button for 1 second to set it to standby mode. - Tips
If the device does not automatically reconnect, despite the fact that the device is in standby mode (the white LED is flashing), then in your smartphone Bluetooth settings try and connect to the device [WB-11B] directly. If it still fails to reconnect after a few tries. then refer to Reset to factory settings to initialize the device.
Basic operations
- Turn power on
Press and hold the power button for 3 seconds.
When the power comes on, the device will vibrate, and “Power on” will appear on the display window.
When turned on for the first time (e.g. when purchasing it or during initialization), the top white LED will flash, indicating pairing standby mode.
When turning on the wena app after initialization, the top white LED flashes, indicating connection standby mode.
Sometimes the wena device will display ‘sync with the app’, this message will disappear during the app set up process or when you next synchronise your device - Turning the power off
Press and hold the power button for 5 seconds. “Bluetooth off” will appear in the display window, keep holding the power button until this changes to “Power off”.
- Measuring your sleep
Launch the wena app. From [Settings] > [Device settings] > [Sleep time settings] > [Sleep tracking], select the sleep [Start time] and [End time].
The device will automatically go into Seep Measuring mode at that time and a bed mark will appear on the device display window.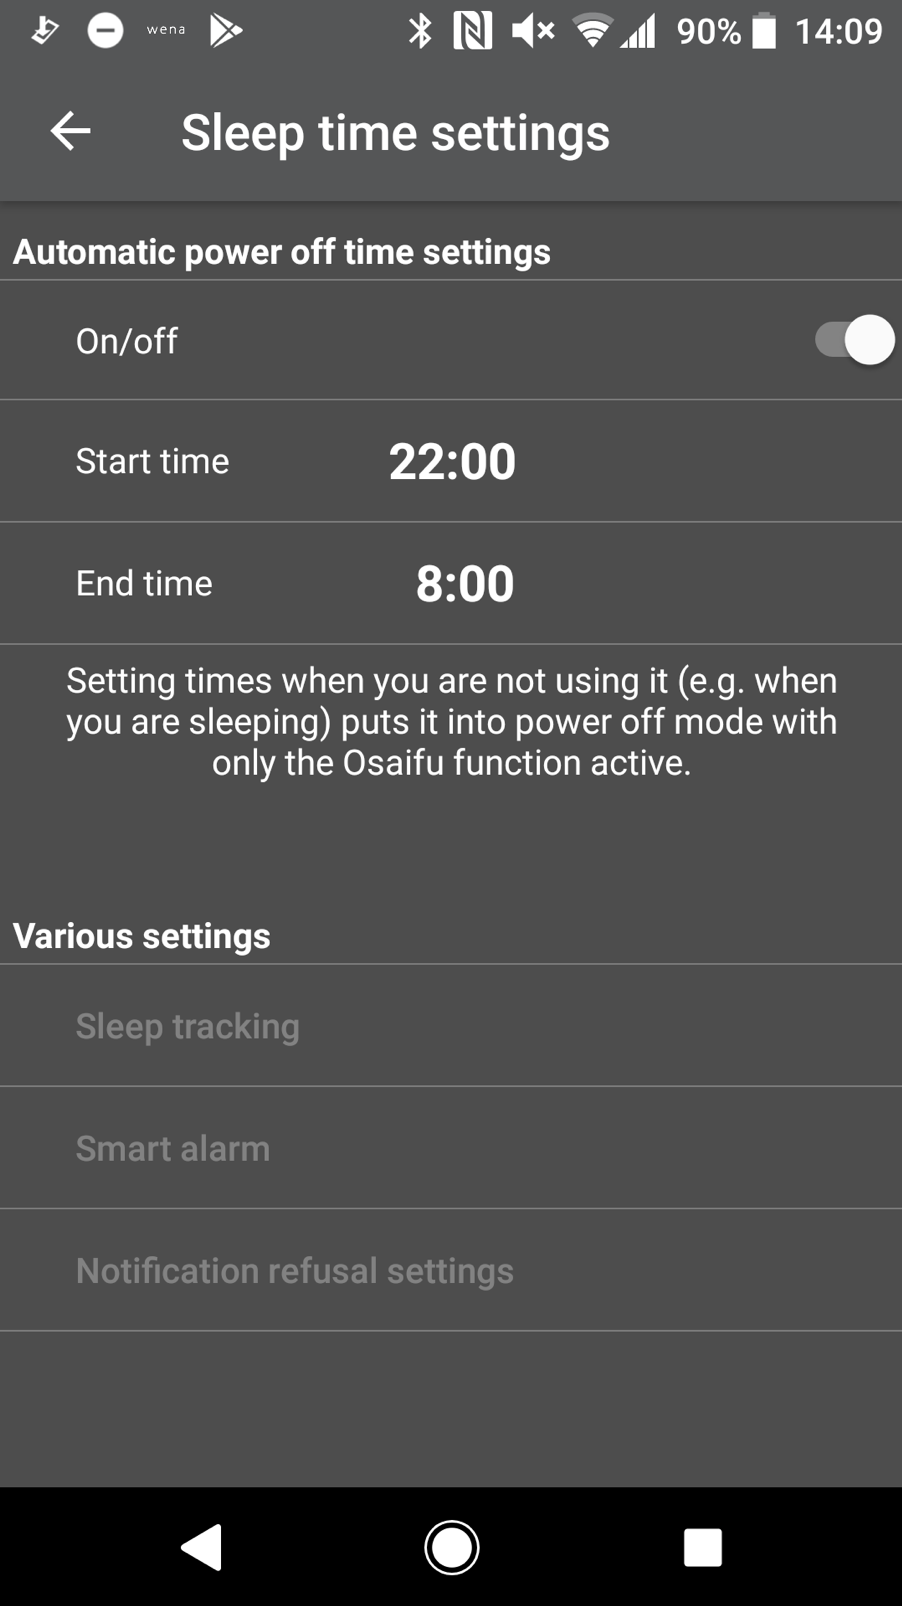
- *Sleep measuring detects sleep based on body movements.
- Check on the device
Tap the power button on the display window of the band to show the remaining power.
- Check with the wena app
After syncing with the wena app, tap on [Dashboard] to see the remaining battery.
Using functions of the band
Tap the tabs ([Dashboard], [News], and [Settings]) to switch screens.
 |
- Dashboard
• You can change the order of the items underneath the dial by moving their position with a drag of your finger.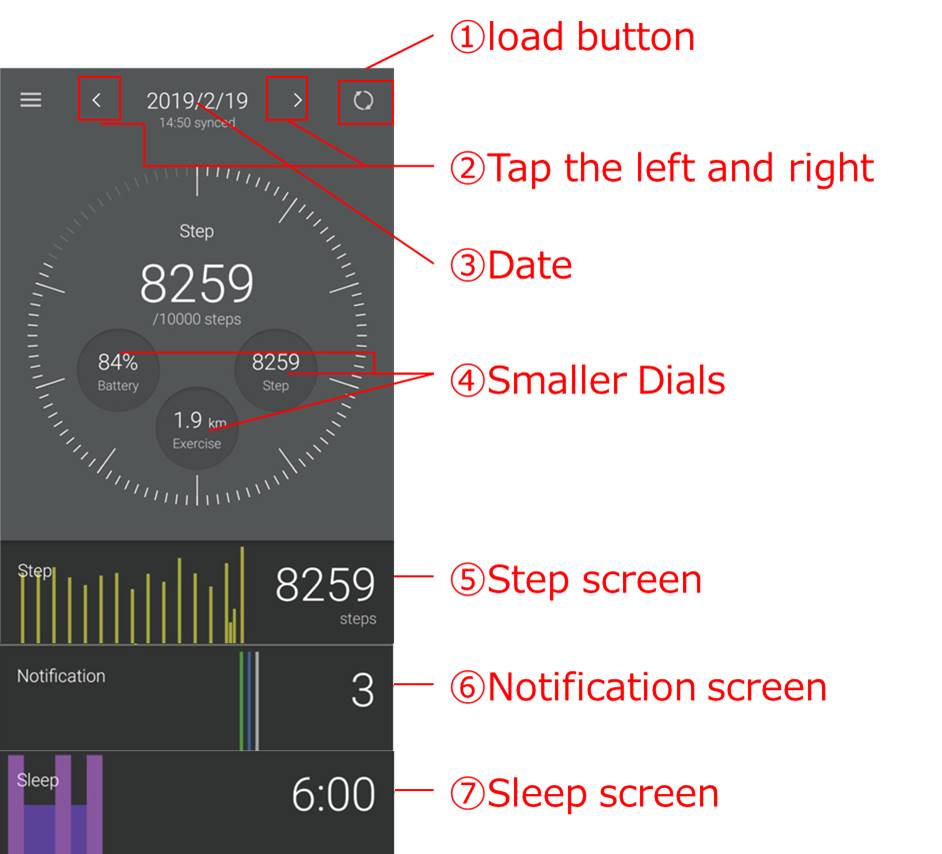
- Load button(1)
Tap to synchronise your app with your wena device and load the device activity log data / power remaining and notification history.
Note: You can also swipe /pull down on the screen to synchronise your data - Load button(1)
- Tap the left and right buttons(2) to change the date (Note from : change needed need to label buttons for example 1 or 2 & refer to these to be clear)
- The contactless area is near the notification (full-colour) LED. Align the contactless area with the terminal.
- Notification of incoming call
- Receiving notification for text messages, social media messages, apps, etc.
The device vibrates, the full-colour LED flashes, and the display window shows details of the notification.
The device will vibrate when receiving a call. The identity of the caller is shown on the display window.
Press the power button to stop the notification. You can set the full-colour LED for particular contacts.
- Add notification settings
- Tap [Settings] > [Device settings] > [Notification settings, then tap [+].
Tap [Add app notifications] / [Add call notifications]
Tap the app or contact to add and follow the instructions onscreen.
- Tap [Settings] > [Device settings] > [Notification settings, then tap [+].
- On the wena app main screen, tap [Settings] > [Device settings] > [Notification settings].
You can set whether to receive notifications or not, the colour of the notification LED, and the number of vibrations.
Tap [Save].
- Tap [Settings] > [Device settings] > [Notification settings, then tap [+].
Tap [Add app notifications]. Tap [Add] and follow the instructions onscreen.
(The Android version wena app has no limit on the number of items. )
The number of vibrations for incoming call notifications cannot be set.
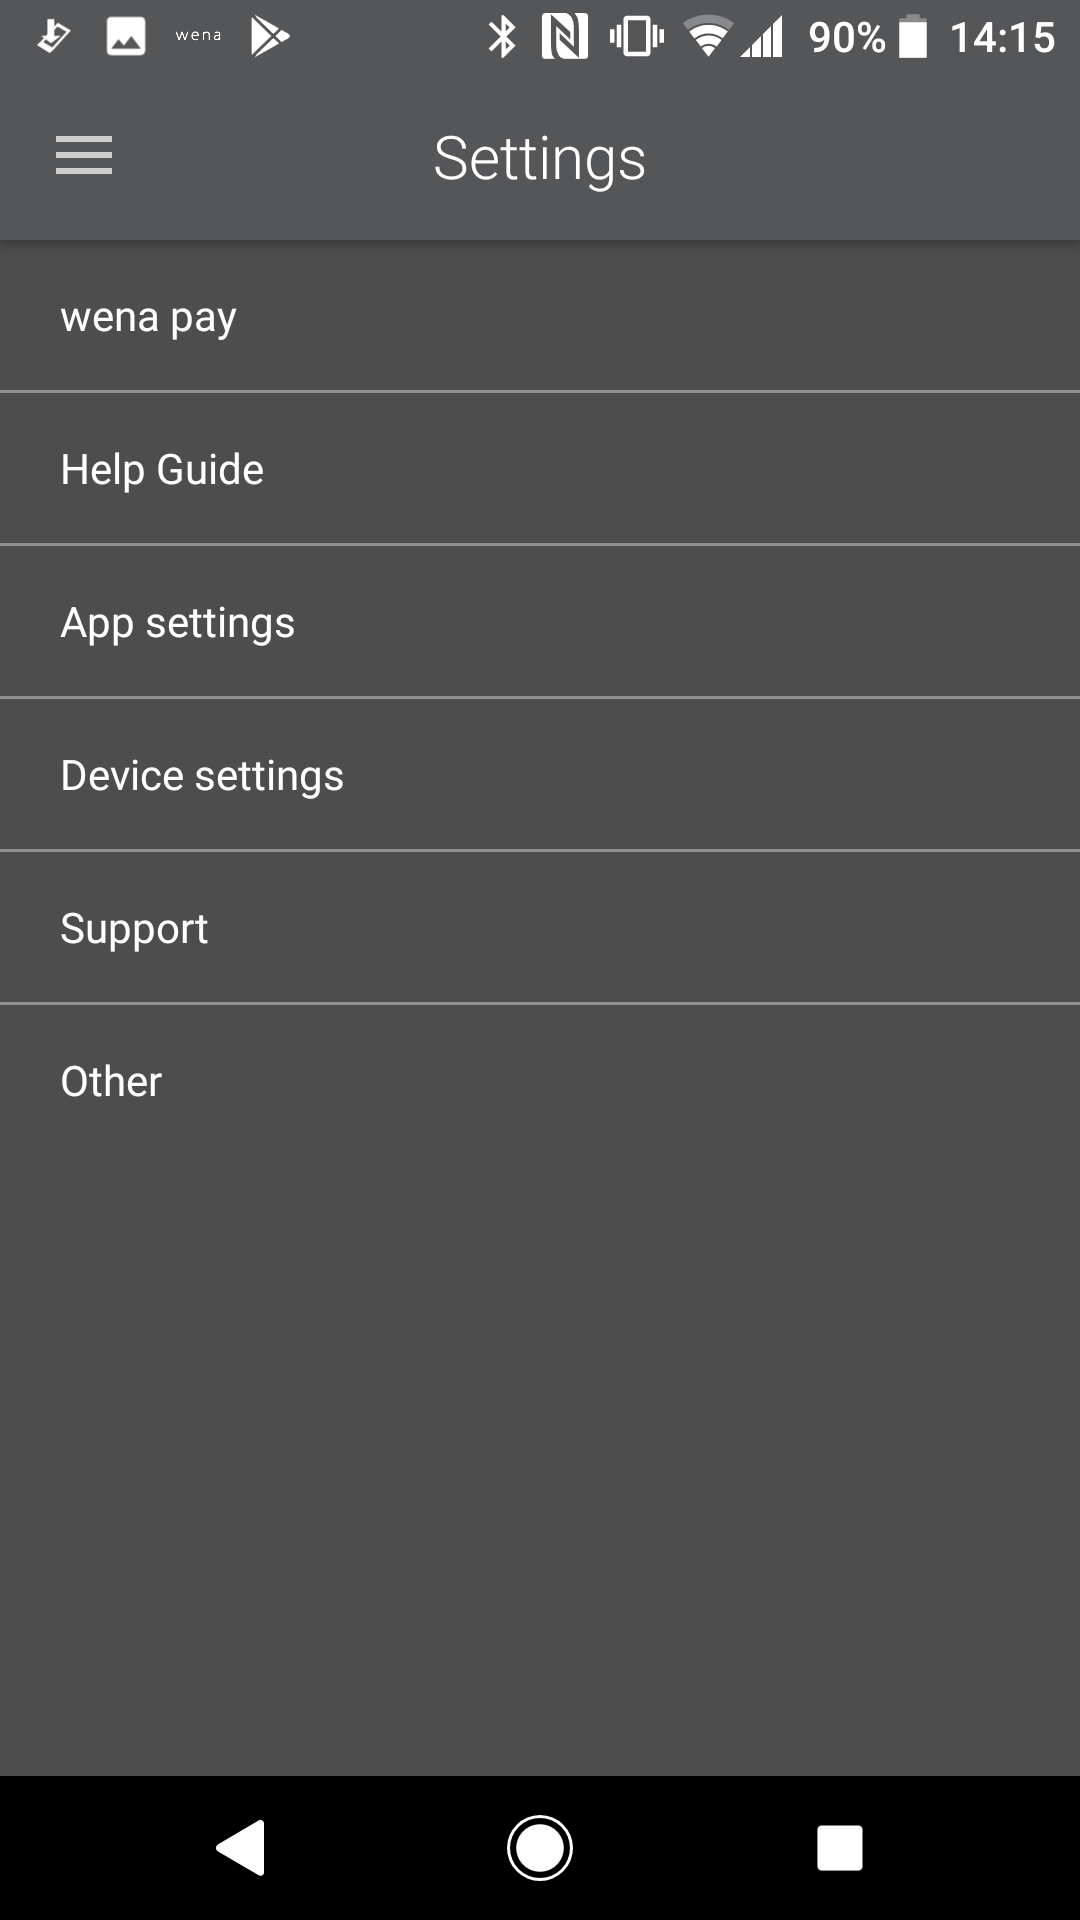
- On the wena app main screen tap [Settings] and select the item you want to set/check.
- Help Guide*
• You can view the help Guide. - App settings
- Add/Delete device:
You can select which wena wrist model to connect to.
You can add or remove devices
You can have one wena active and one wena pro registered against your app at any one time. - Link to Apple Health app:
You can turn this l function on to automatically send the wena app activity log data to the Apple Health app. (iOS only) - Link to Google Fit
You can turn this function on to automatically send the wena app activity log data to the Google Fit. (Android only) - Account settings:
You can register or login into your account. - App colour theme settings:
Here you can select the colour theme of the app. - Data upload settings:
You can select data to upload to server. - Regular background sync
You can set to sync the data in the background even when the app is not running. - Data display start time settings:
You can set the start time for a day.
This is the time that your statistics for the day will start measuring from.
- Add/Delete device:
- Device settings
- Notification settings:
You can set whether to receive notifications or not, the colour of the notification LED, and the number of vibrations. - Activity settings:
You can set your height, weight and target steps. You can also set to be notified when you reach your step target. - Bluetooth connection settings:
You can set it to turn Bluetooth on the wena device off it has been disconnected from your phone for 15 minutes off if it has not connected for 15 minutes (e.g. when your smartphone is not near you). This will consume less power on the wena device. - Display settings:
There are a number of options available to make changes to the layout and information displayed on the wena device’s display window. These are as follows.
Arm to wear wena wrist: Set the device display to change display orientation. Set to ‘Left Wrist’ if you wear your wena device with the power button facing towards your hand and set to ‘Right Wrist’ if you wear your wena device with the power button facing away from your hand.
Number lines:Set to 1 or 2 lines. 2 line display more information on a single screen. 1 line display shows larger text
Notification length:Set the amount of text that you want to see scroll across the display on your wena device when you receive a notification.
Display order:Set the order items are displayed in on your wena device screen. The first item in the list will require one push of the power button to see, the second two pushes and so on. This may be of particular interest for payment as it determines how many times you need to push the button every time you make a payment.
Time Display:Set to see the time on your wena device. This displays the same time as your smartphone
Automatic Display:Set your wena device display to automatically display when you turn or raise your wrist. In addition you can set what times to turn this off (so it does not disturb you at night) - Sleep time settings:
You can change the following settings.
Smart alarm settings:You can set an alarm to wake you with a vibration on your wena device, this can be set to wake you when you are in light sleep.
Sleep tracking settings:You can set the start and end times for measuring sleep.
Notification refusal settings:you can set times to refuse notifications from the smartphone. - Set vibration strength:
You can set the strength of the vibrations (weak, medium, strong) - Disconnection notification:
You can set to be notified if your wena devices disconnects from your phone. - Rewrite settings:
You can rewrite all settings in the app to this device.
- Notification settings:
- Support*
You can view the official wena support page. - Other
View license and version information, you can also check and update software versions
- You must initialize this device when connecting to a new smartphone
- Notes: When you initialize the device, all settings and information related to pairing will be deleted. Information relating to wena pay will remain..
- Push and hold the power button for 6 seconds to turn the device off.
The device will vibrate once and “Power off” will appear in the OLED display window. - After the power is off, press and hold the power key for 7 seconds. It will vibrate and “Initializing...” will appear in the display window. Once this message appears, quickly remove your finger from the button.
It will forcibly reset itself and restart.
Next rewrite the settings to connect with the wena app to use the device.
Main specification
- Band Refer to items with this icon about the band
- Head Refer to items with this icon about the head
- Table of Contents
-
-
Before you start
- Names of band parts
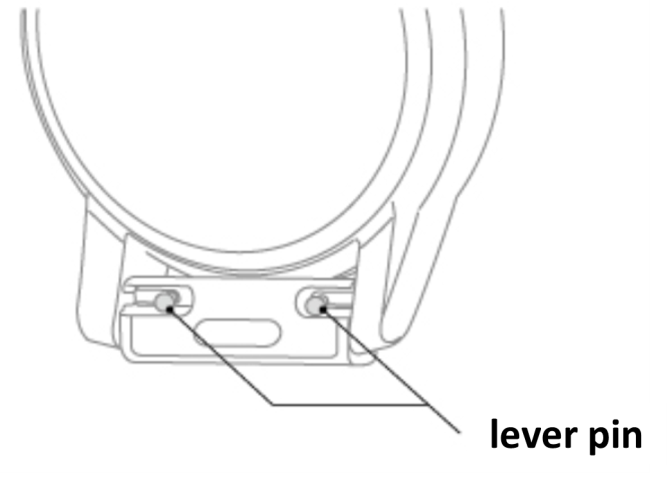
1.Attach the watch head link to the watch head.
If a wena watch head is being attached to the wena band
Please use the 22mm watch head link which is located in the top of the box next to the wena active band.
If a different watch head (non wena) is being attached
In addition to the 22mm watch head link, 18mm and 20mm watch head links are included in the box (these should be found with the other accessories at the bottom of the box).
Please use the appropriate size for your watch,
Press the lever pins of the watch head link inwards, align the watch head links with the holes on the watch head, then release the lever pins so that they click into place. The band should now be firmly attached to the watch head.
2.Attaching the band to the watch head link

Pull each watch head link tab out towards you (1) and turn counterclockwise 90 degrees (2). Push the watch head links through the holes on the wena band (3) and turn clockwise 90 degrees. The band should now be firmly attached to the watch head
Getting it ready
- Before you use your device for the first time you should fully charge it
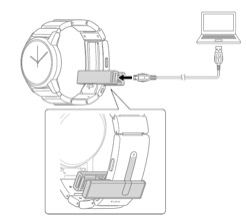
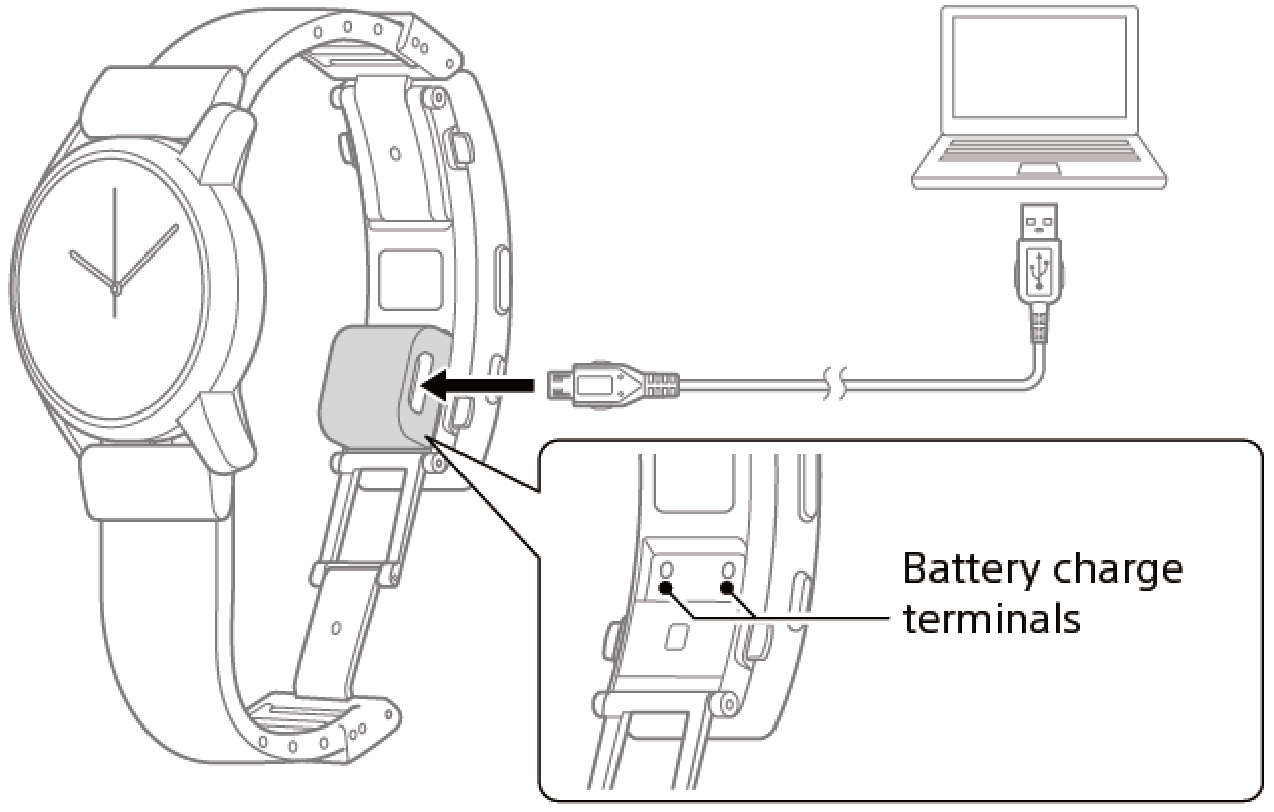
- Charge the band by using the supplied charging connector and micro-USB cable.
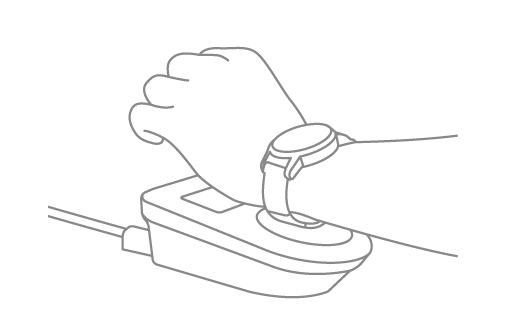
- Unclip the clasp on the watch to reveal two battery charging terminals on the underside of the wena band (2 small circles), this is where you will need to attach the wena charging connector to.
- Attach the charging connector as in the diagram below, clicking it into place with the band’s battery charge terminals.
When removing the charging connector, press the buckle release buttons on each side of the band at the same time. - Please ensure that you attach clip to the band exactly as shown in the diagram.
When the clip is connected correctly the band should start charging. You should feel a small vibration and a small red light will appear on the band’s display.
If it is not connected properly check that you have attached the charging connector in the correct place and that it is clipped into place.
Follow the instructions below.
- Turn the device’s power on by holding the power button for 3 seconds.
- Launch the wena app
- Follow the tutorial to connect with your smartphone
When asked for the pass key,
input the 6.digit number(a) that appears on the device’ display window.
Follow the app’s tutorial for initialization.
- Tips
If Bluetooth on your device turns off, simply press the button for approximately 1 second until you feel a vibration and the wena device screen shows ‘connected’ If you keep your wena device close to your phone it should stay connected. If your wena device is separated (disconnected) from your phone, it will automatically try and connect again when your phone is in range. If you have issues with connection, please try turning Bluetooth off and then on again on your smart phone and wena device and then retry.
Please ensure
- That you have registered an account and are logged into the account on your wena App.
- Your wena device is connected to your smartphone and wena App.
- Your smartphone is connected to a mobile or wi-fi network.
- You are wearing your wena device with the clasp closed around your wrist.
- You have a valid card for use with wena pay.
- Step 1
From the wena mobile app, select [Settings] > [wena pay] - Step 2
Please review and accept the terms presented to proceed. - Step 3
Set a 4 digit PIN and confirm the same PIN again (you will need this pin to access the wena pay menu in the future)
You can now add a card to the wena pay app
- Step 1
From the wena mobile app, select [Settings] > [wena pay] - Step 2
Enter the registered 4-digit PIN code. - Step 3
It is only possible to add certain cards to the wena pay service.Please see here for the cards that can be registered.
Select [ADD CARD] and enter your credit card information (you can scan your card with your phone’s camera or manually input it)
Select [ADD CARD] again After a few seconds the terms and conditions of your credit card provider should appear. - Step 4
Read and agree to the Terms and conditions.
A confirmation should then appear to confirm that your card has been added successfully. Please confirm with OK and an image of your card should now be displayed. - Step 5
In some cases, your bank may require additional verification.
If you see ‘Verification Required’ below the image of your card Select [SMS to ****]. This will send a text message to your phone with an activation code. Once you receive the activation code from your bank, enter the code on the screen. A confirmation should then appear to confirm that your card has been activated successfully. To authorise your device for payment you may need to exit wena pay and then enter your pin code again. Once done you should see the wena pay option on your wena device (press the button on the wena device until it appears).
- Step 1
From the wena mobile app, select [Settings] > [wena pay] - Step 2
Enter the registered 4-digit PIN code. - Step 3
Select […] on upper-right corner on the card
If you select [suspend], you can suspend your card and see [SUSPENDED] icon on the card
If you select [Remove], you can delete your card from wena pay.
If you have multiple cards in wena pay, please set a default or primary card for making payments.
To authorise wena device to make payments take the following steps:
- Step 1
From the wena mobile app, select [Settings] > [wena pay] - Step 2
Enter the registered 4-digit PIN code. - Step 3
Push the power key on your wena wrist several times to see ,
then release the power key and the following symbol should appear - Step 4
Within 60 seconds, hold your wena wrist on the payment reader.
The watch vibrates and displays a check mark when it is finished communicating with the reader and payment is confirmed.
- Device modes
Device connected (Bluetooth on):the Bluetooth mark will show in the display window.
Standby mode (Bluetooth on): LED flashes in white colour.
Bluetooth off: Bluetooth mark is not displayed, and the LED does not flash.
*When Bluetooth is off, the notification function cannot be used. - To reconnect
*When the paired smartphone (with Bluetooth turned on) is brought near to the wena device, it will automatically reconnect.
*If Bluetooth of wena wrist is off, press and hold the power button for 1 second to set it to standby mode. - Tips
If the device does not automatically reconnect, despite the fact that the device is in standby mode (the white LED is flashing), then in your smartphone Bluetooth settings try and connect to the device [[WA-01B] directly. If it still fails to reconnect after a few tries. then refer to Reset to factory settings to initialize the device.
Basic operations
- Turn power on
Press and hold the power button for 3 seconds.
When the power comes on, the device will vibrate, and “Power on” will appear on the display window.
When turned on for the first time (e.g. when purchasing it or during initialization), the top white LED will flash, indicating pairing standby mode.
When turning on the wena app after initialization, the top white LED flashes, indicating connection standby mode. Sometimes the wena device will display ‘sync with the app’, this message will disappear during the app set up process or when you next synchronise your device - Turning the power off
Press and hold the power button for 5 seconds. “Bluetooth off” will appear in the display window, keep holding the power button until this changes to “Power off”.
- Measuring your sleep
Launch the wena app. From [Settings] > [Device settings] > [Sleep time settings] > [Sleep tracking], select the sleep [Start time] and [End time].
The device will automatically go into Seep Measuring mode at that time and a bed mark will appear on the device display window.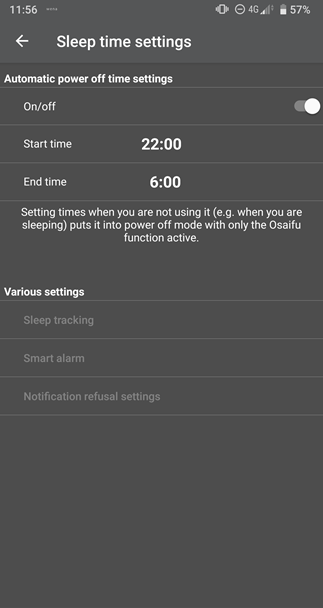 *Sleep measuring detects sleep based on body movements
- Check on this device
Tap the power button on the display window of the band to show the remaining power.
- Check with the wena app
After syncing with the wena app, tap on [Dashboard].
To continue measuring your heart rate when not in active mode, in the app go to [Settings] > [Device settings] > [Heart rate sensor settings].
Change the [Heart rate sensor settings] to [Always measure].
Using functions of the band
Tap the tabs ([Dashboard], [News], and [Settings]) to switch screens.
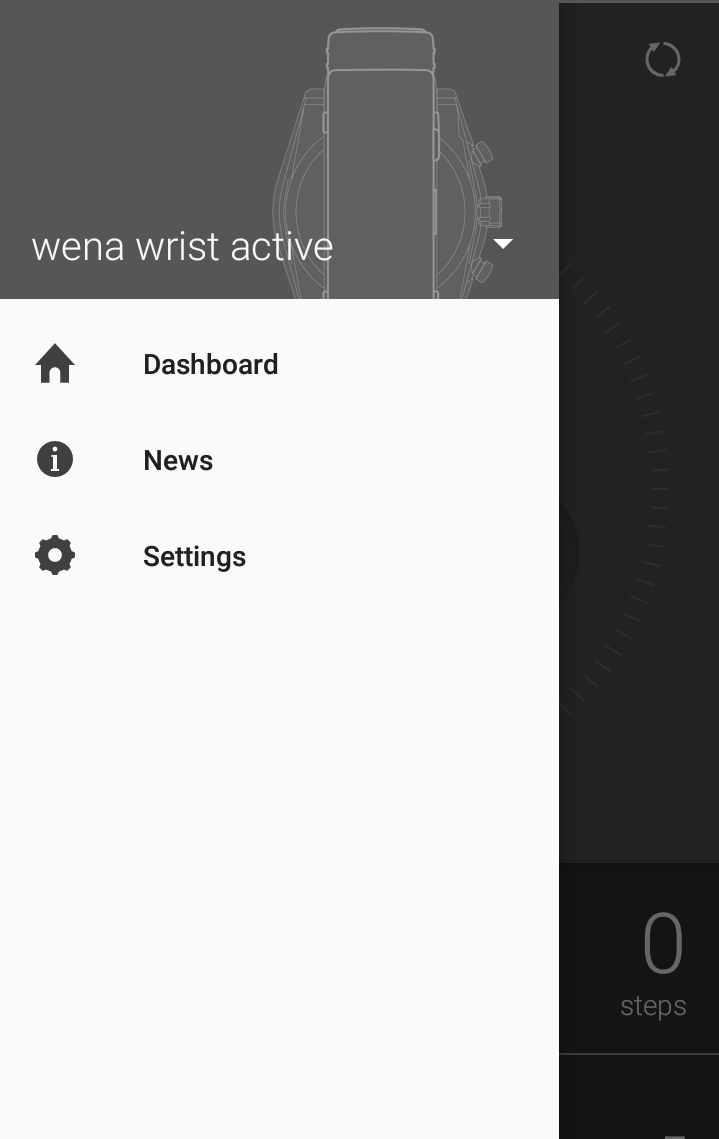
- Dashboard
You can change the order of the items underneath the dial by moving their position with a drag of your finger.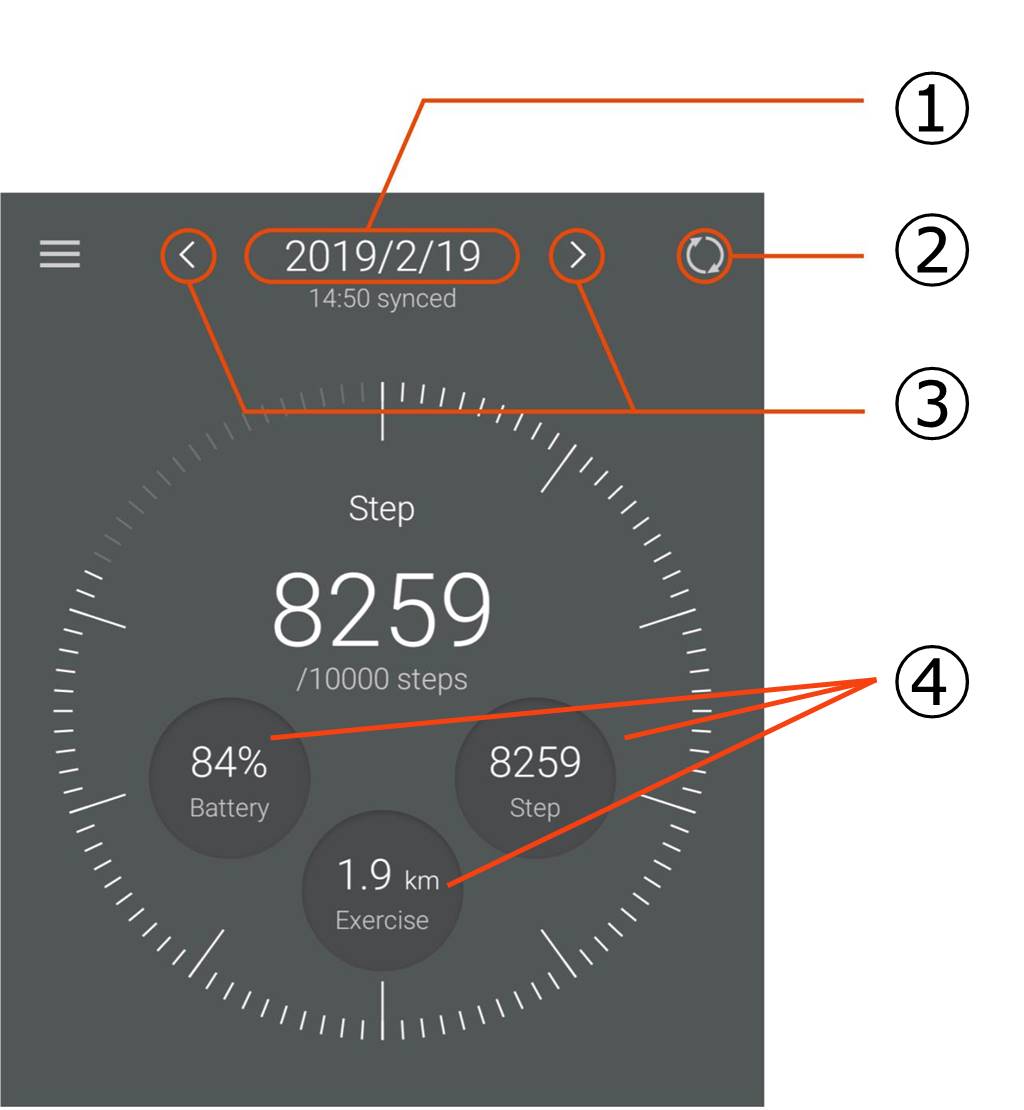
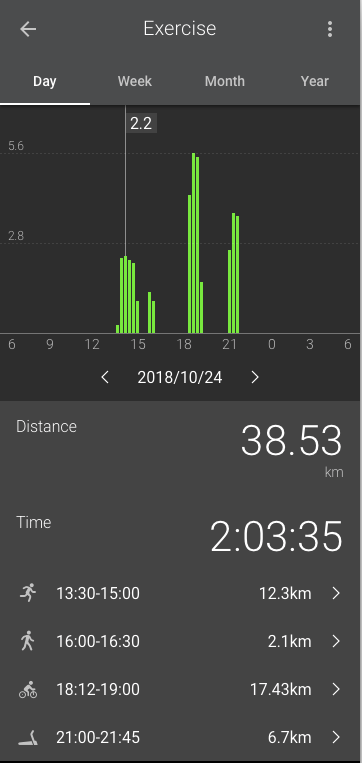
- Date
Tap to switch day/week/month/year.
- Date
- Load button
- Tap the left and right buttons to change the date
- Smaller Dials
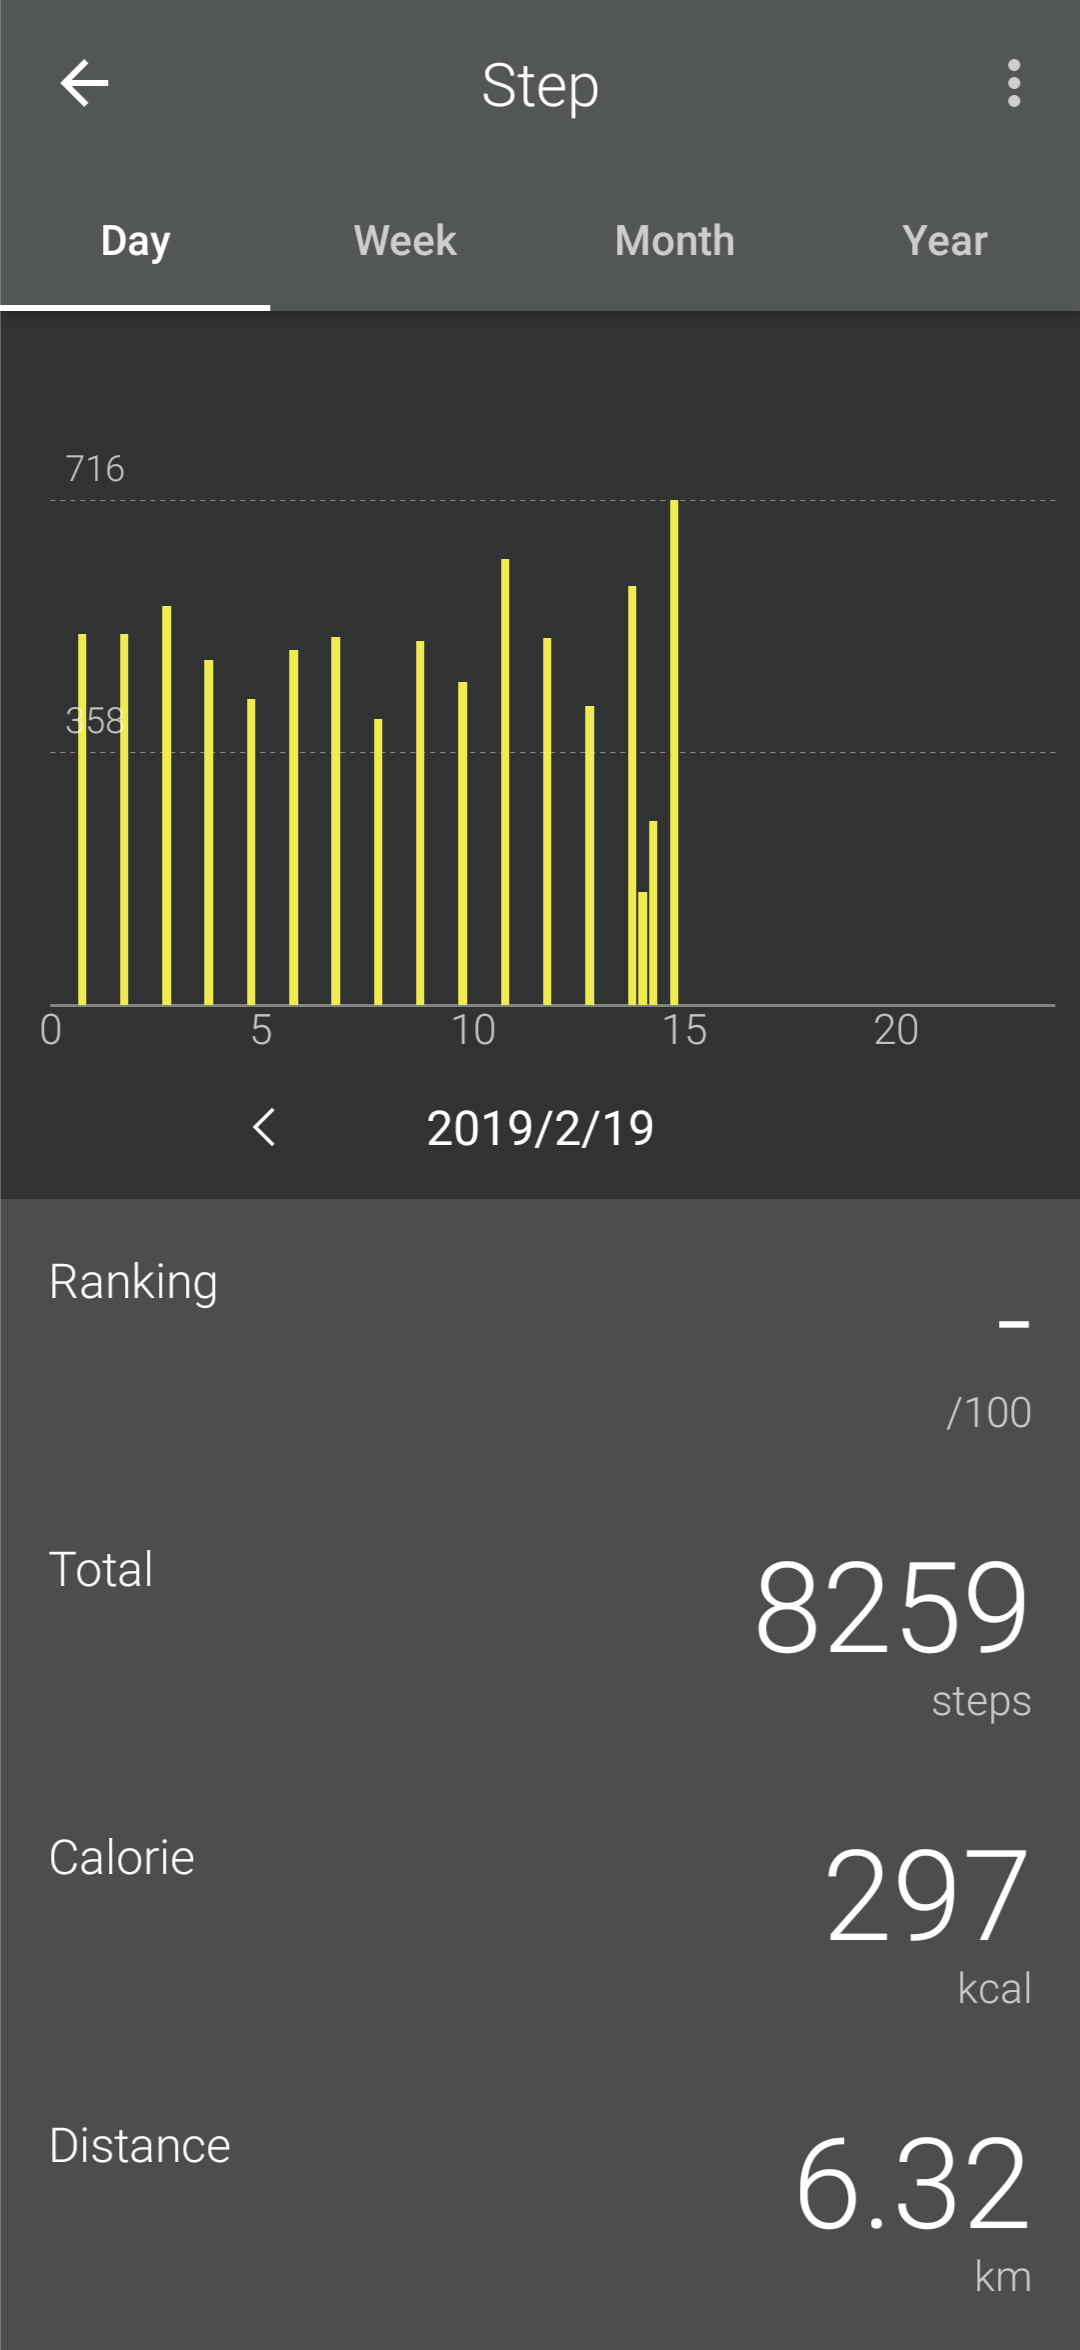
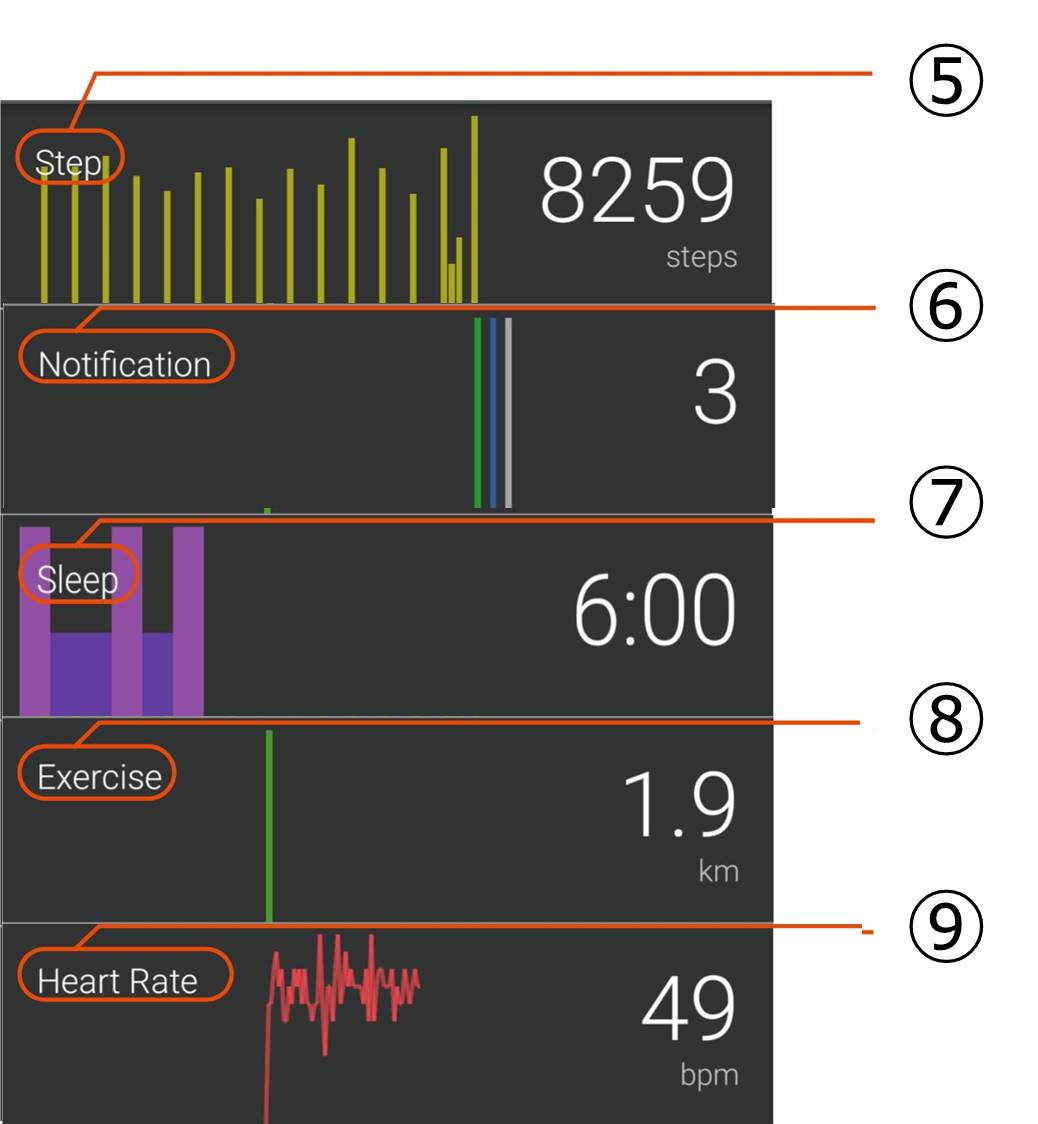
- Step screen
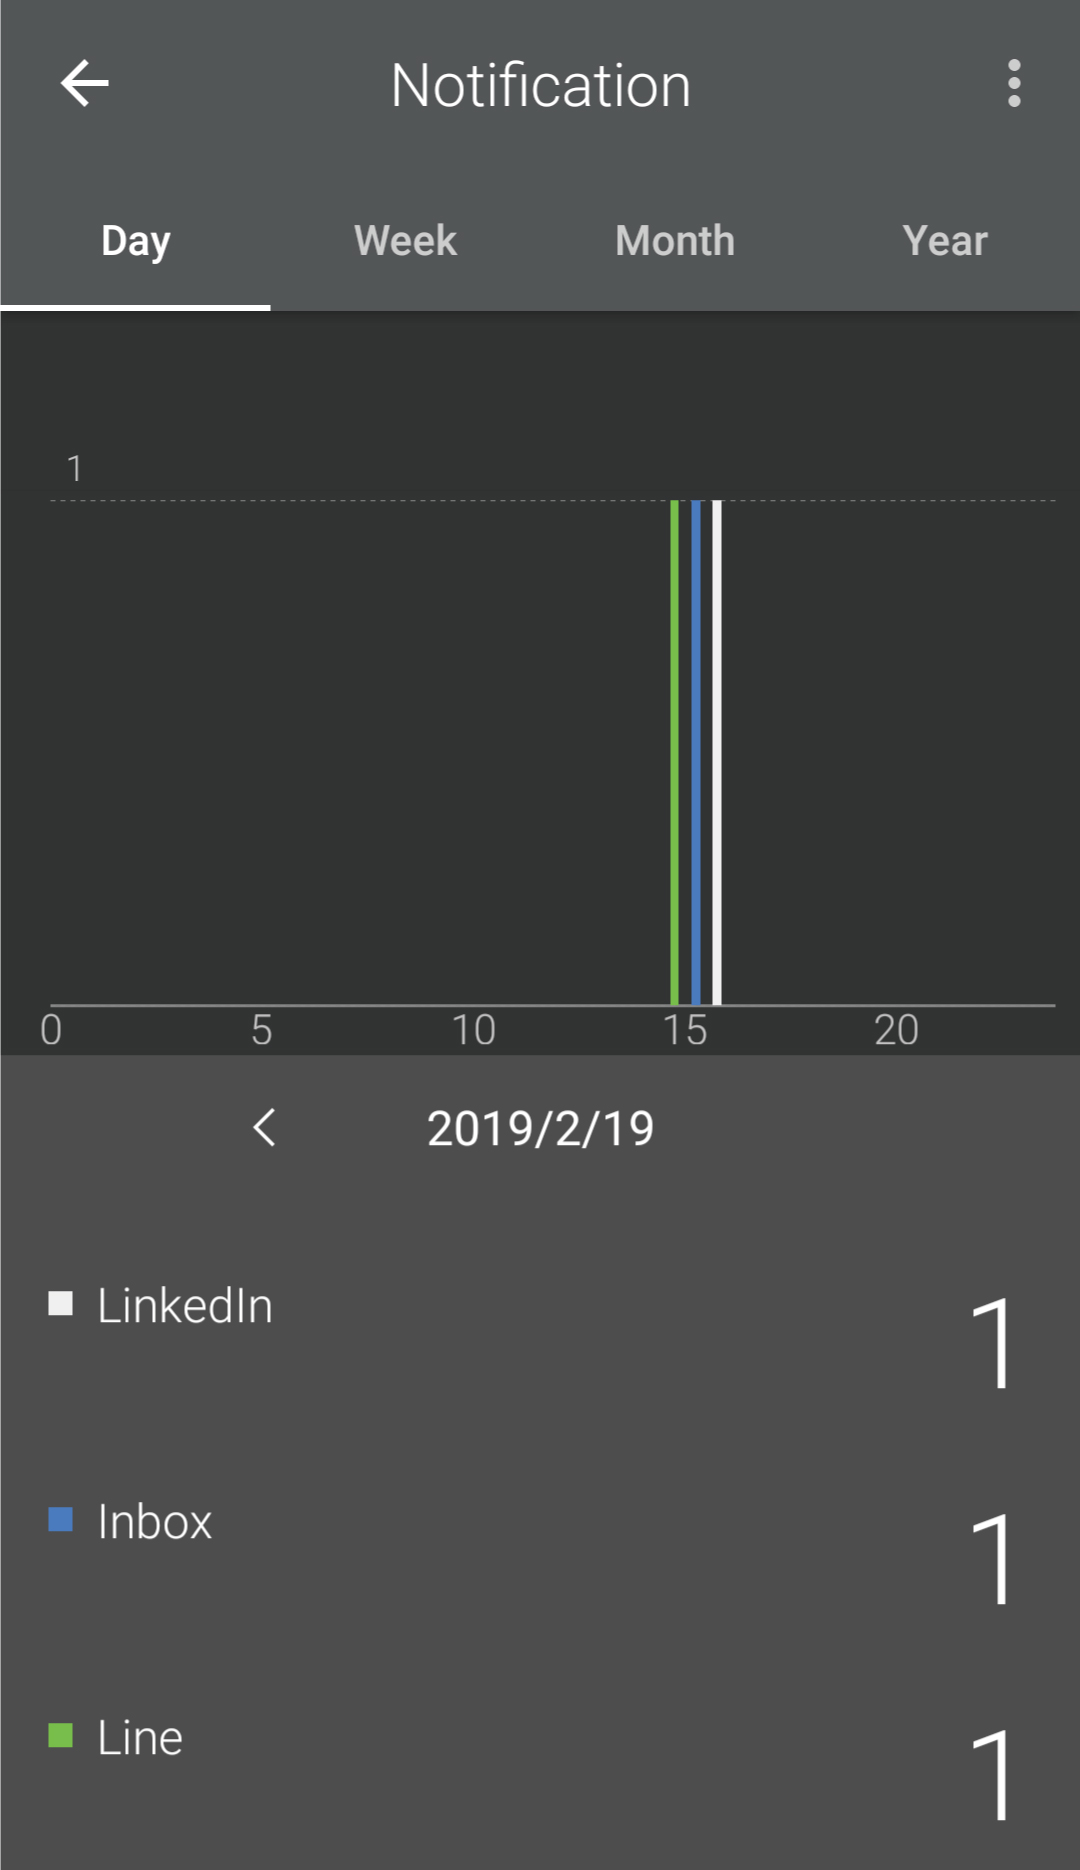
Tap to show logs for paces/calories/distance. - Notification screen
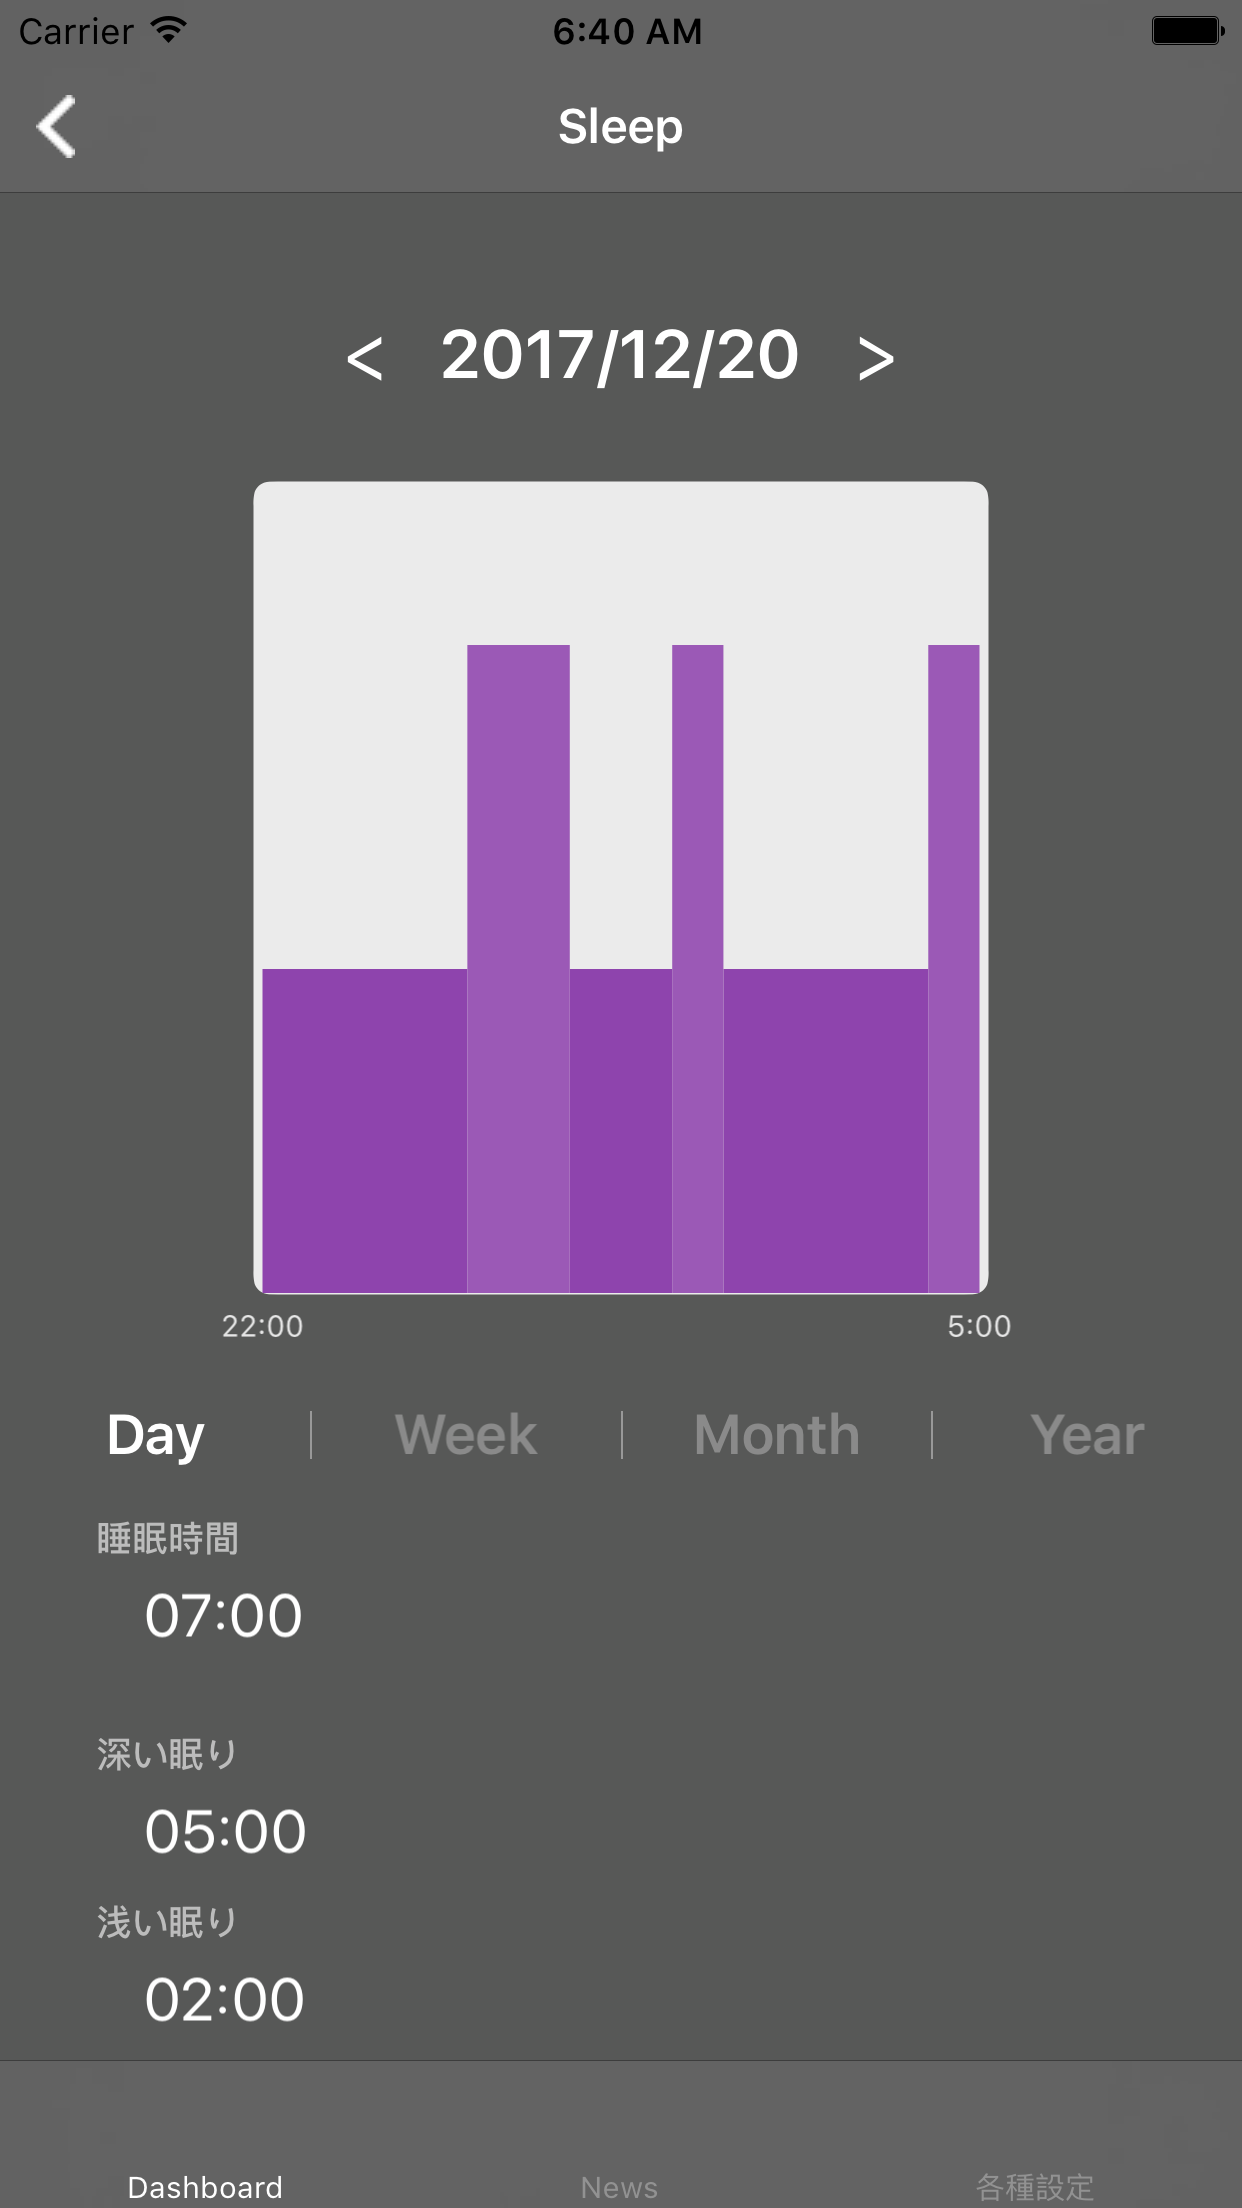
Tap to show the notifications log. - Sleep screen
Tap to show the sleep log recorded. - Exercise screen
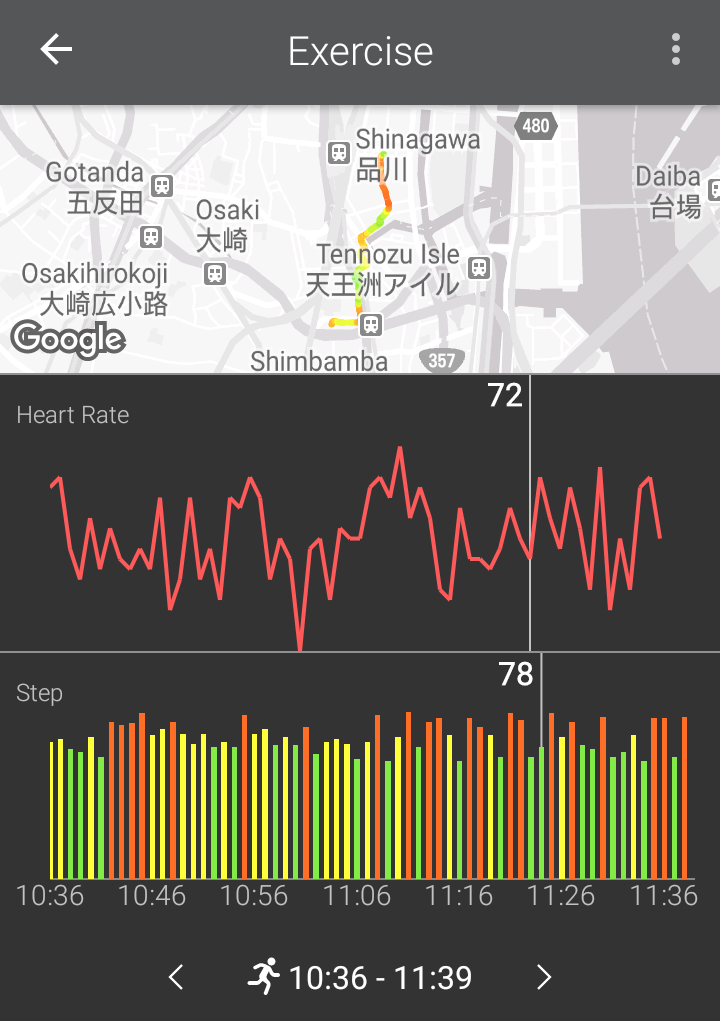
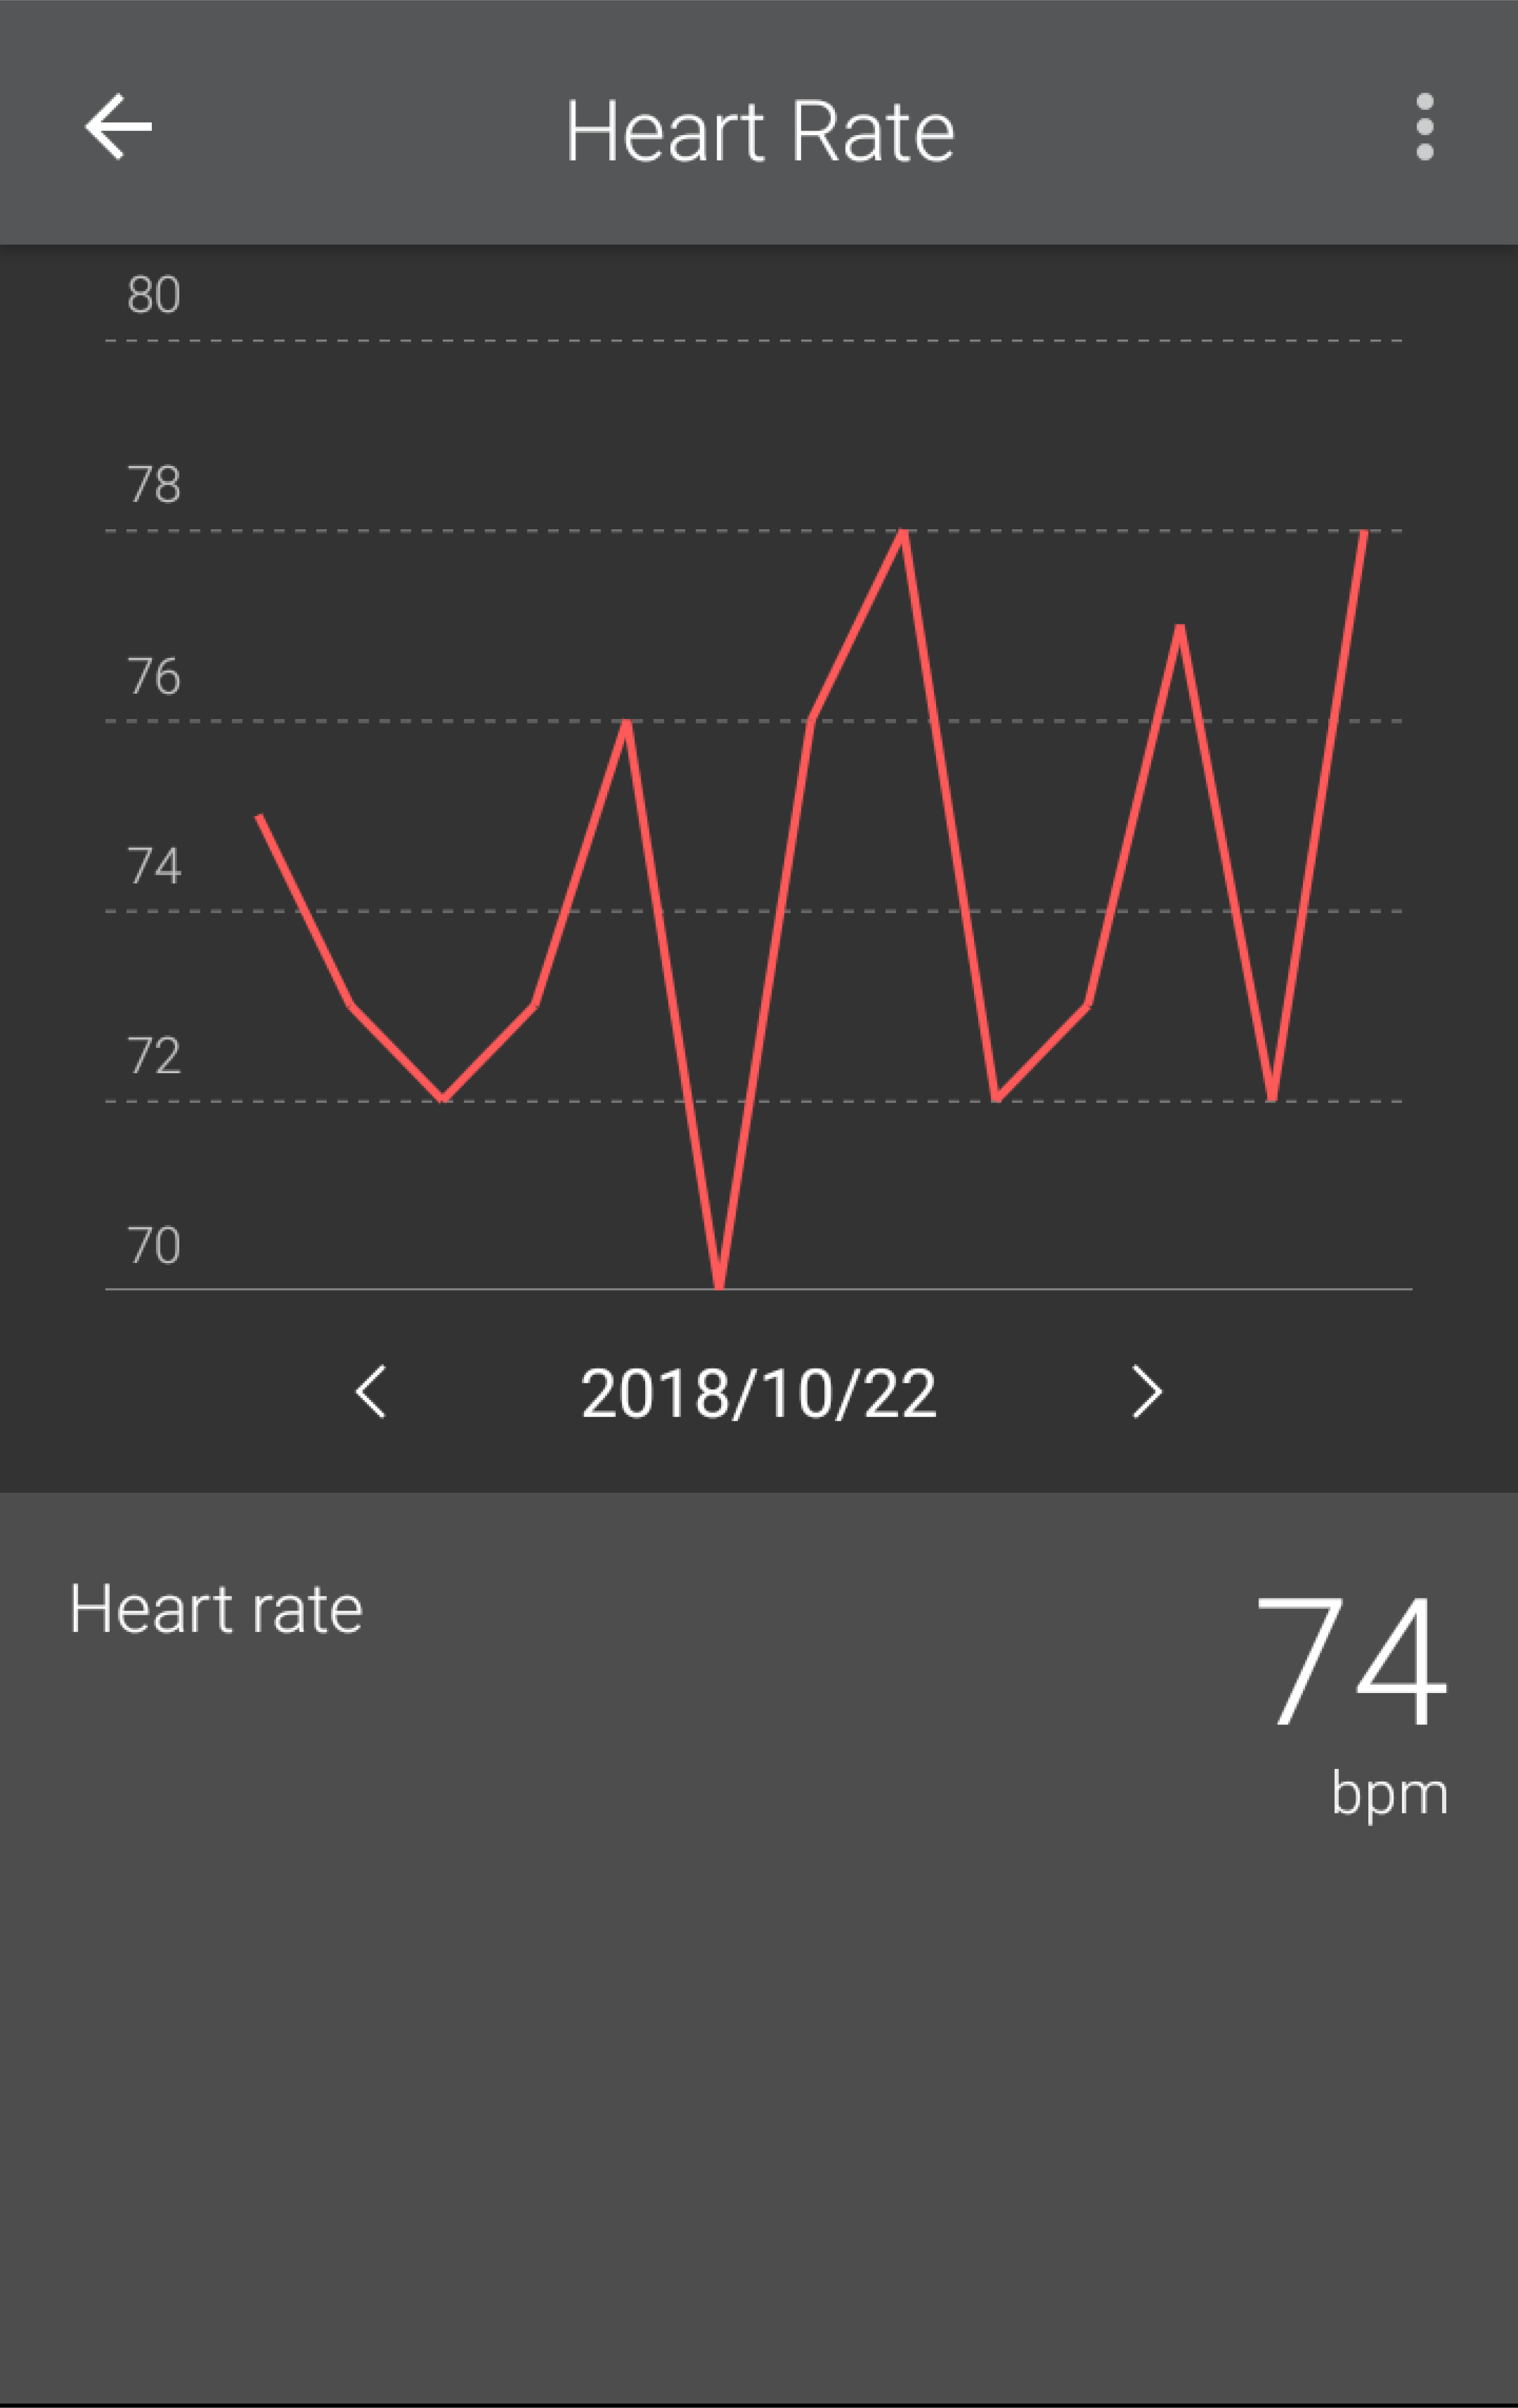
Tap to show the GPS log and heart rate log. - Heart Rate screen
Tap to show the heart rate* information recorded. - News
Shows pictures posted by an account registered user on a timeline. - Settings
Operate settings from here.
Tap to synchronise your app with your wena device and load the device activity log data / power remaining and notification history.
Note: You can also swipe /pull down on the screen to synchronise your data.
Taps to change any of the three smaller dials to show a different measure.
- The contactless area is near the notification (full-colour) LED. Align the contactless area with the terminal.
- Set a timer to record the duration of your activity
- The type of activity (walking, running, cycling etc.)
- Measure your heart rate
- Track your location / route for example your running route
- Calculate your pace
- View real time stats on the wena device and the activity results in the wena App
- Notes:Active mode can be used with GPS turned on or off. If GPS is turned off then it is not possible to track your location / route.
To use Active Mode, press and hold the active button for 1 second
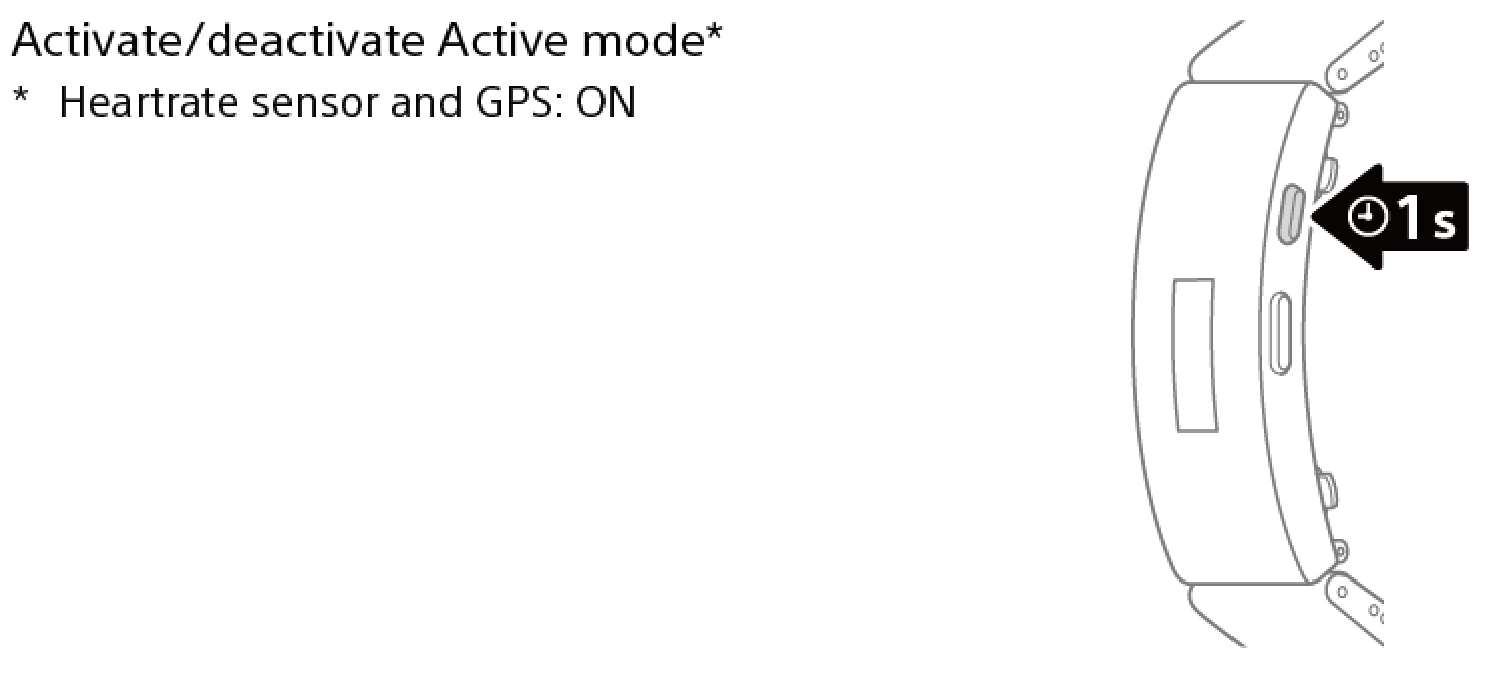
Press the Active button again to turn GPS on or the power button to turn GPS off.
Once the GPS Satellites have been located you are prompted to press the Active button again to start recording your activity (to stop your activity recording press the active button again)
To measure your heart rate accurately, be sure to wear the wena wrist so that it comes in solid contact with your skin. If the sensor is in poor contact with your skin, the wena wrist active may fail to measure the heartrate accurately.
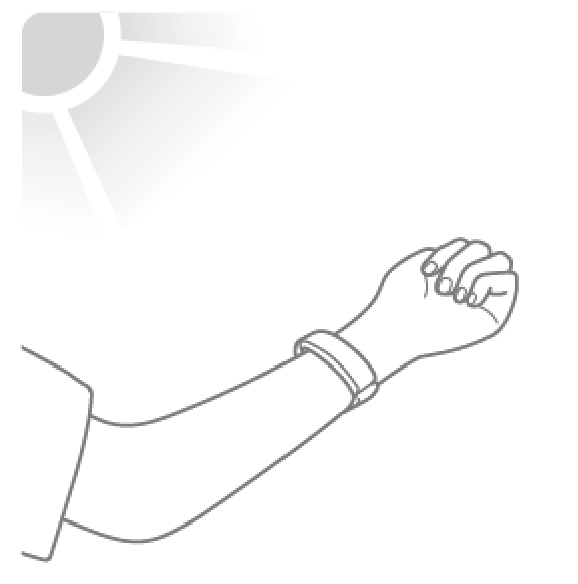
To use the GPS function, hold the display of the wena wrist active skyward until it finishes receiving the GPS coordinates.
- Notification function
- Notification of incoming call
The device will vibrate when receiving a call. The identity of the caller is shown on the display window.
Press the power button to stop the notification.
- Receiving notification for text messages, social media messages, apps, etc.
The device vibrates, the full-colour LED flashes, and the display window shows details of the notification.
Using the notification function - Add notification settings
- Tap [Settings] > [Device settings] > [Notification settings, then tap [+].
Tap [Add app notifications] / [Add call notifications]
Tap the app or contact to add and follow the instructions onscreen.
- Tap [Settings] > [Device settings] > [Notification settings, then tap [+].
- Change notifications
- On the wena app main screen, tap [Settings] > [Device settings] > [Notification settings].
You can set whether to receive notifications or not, the colour of the notification LED, and the number of vibrations.
Tap [Save].
- On the wena app main screen, tap [Settings] > [Device settings] > [Notification settings].
- To add notifications for apps not in the app list (iOS apps)
- Tap [Settings] > [Device settings] > [Notification settings, then tap [+].
Tap [Add app notifications]. Tap [Add] and follow the instructions onscreen.
- Tap [Settings] > [Device settings] > [Notification settings, then tap [+].
- TipsThe iOS version wena app can register 14 contacts for incoming call notifications, and 15 for receipt notifications (for mail or social media and other apps).
(The Android version wena app has no limit on the number of items. )
The number of vibrations for incoming call notifications cannot be set.
If the set notifications fail to come, refer here.
- Help Guide*
You can view the Help Guide. - App settings
- Add/Delete device:
You can select which wena wrist model to connect to.
You can add or remove devices.
You can have one wena active and one wena pro registered against your app at any one time. - Link to Apple’s Health app:
You can turn this linking function on to automatically record the wena app activity log in the Apple Health app. (iOS only) - Link to Google Fit:
You can turn this function on to automatically send the wena app activity log data to the Google Fit. (Android only) - Account settings:
You can register your account. - App colour theme settings:
Here you can select the colour of the app. - Data upload settings:
You can select data to upload to server. - Regular background sync:
You can set to sync the data in the background even when the app is not running. - Data display start time settings:
You can set the start time for a day. This is the time that your statistics for the day will start measuring from.
- Add/Delete device:
- Device settings
- Notification settings:
You can set whether to receive notifications or not, the colour of the notification LED, and the number of vibrations. - Activity settings:
You can set your height, weight and target steps. You can also set to be notified when you reach your step target. - Bluetooth connection settings:
You can set to turn Bluetooth on the wena device off if it has been disconnected from your phone for 15 minutes (e.g. when your smartphone is not near you). This will consume less power on the wena device. - Display settings:There are a number of options available to make changes to the layout and information displayed on the wena device’s display window. These are as follows:
- Arm to wear wena wrist:Set the device display to change display orientation. Set to ‘Left Wrist’ if you wear your wena device with the power button facing towards your hand and set to ‘Right Wrist’ if you wear your wena device with the power button facing away from your hand.
- Number lines:
Set to 1 or 2 lines. The 2 line display shows more information on a single screen and the 1 line display shows larger text - Notification length:
Set the amount of text that you want to see scroll across the display on your wena device when you receive a notification. - Display order:
Set the order items are displayed on your wena device screen. The first item in the list will require one push of the power button to see, the second two pushes and so on. This may be of particular interest for payment as it determines how many times you need to push the button every time you make a payment. - Time Display:
Set to see the time on your wena device. This displays the same time as your smartphone - Automatic Display:
Set your wena device display to automatically display when you turn or raise your wrist. In addition you can set what times to turn this off (so it does not disturb you at night) - Sleep time settings:
- Smart alarm settings:
You can set an alarm to wake you with a vibration on your wena device, this can be set to wake you when you are in light sleep. - Sleep tracking settings:
You can set the start and end times for measuring sleep. - Notification refusal settings:
You can set the start and end times to refuse notifications from your smartphone. - Set vibration strength:
You can set the strength of the vibrations (weak, medium, strong) - Disconnection notification:
You can set to be notified if your wena devices disconnects from your phone. - Rewrite settings:
You can rewrite all settings in the app to this device.
- Notification settings:
- Support*
You can view the official wena support page. - Other
View license and version information, you can also check and update software versions
Notes: When you initialize the device, all settings and information relating to pairing will be erased. Information relating to wena pay is not erased.
- Push and hold the power button for 6 seconds to turn the device off.
The device will vibrate once and “Power off” will appear in the OLED display window. - After the power is off, press and hold the power key for 7 seconds. It will vibrate and “Initializing...” will appear in the display window. Once this message is appears, quickly remove your finger from the button.
It will forcibly reset itself and restart.
Next rewrite the settings to connect with the wena app to use the device.
Main specification
- Band Refer to items with this icon about the band
- Head Refer to items with this icon about the genuine head
- Table of Contents
-
-
- Names of parts
-
- Names of head parts
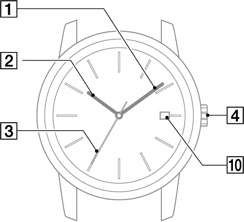
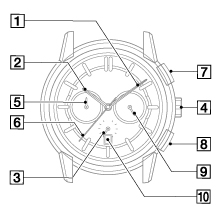
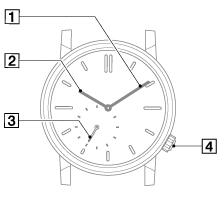
Three Hands
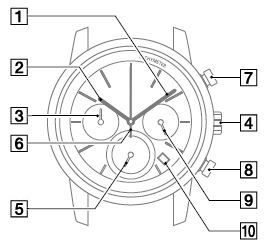
Chronograph
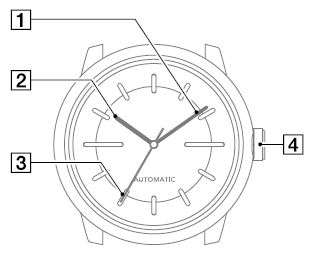
Three Hands Mechanical
Three Hands Solar
Chronograph Solar
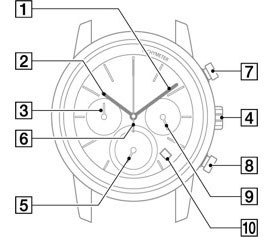
Chronograph Classic
Three Hands Retro
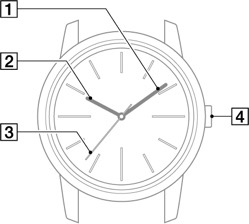
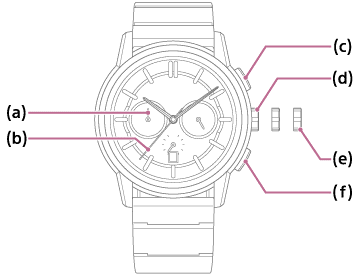
- Minute hand
- Hour hand
- Second hand
- Crown
- Chronograph minute hand
- Chronograph second hand
- Stopwatch (start/stop) button
- Stopwatch (reset) button
- 24-hour hand
- Date
- Names of head parts
- Setting the time
-
- • When the second hand (3) reaches the zero seconds position, pull the crown (4) to the right.
- • Turn the crown (4) to set the time.
- • Set the time, then return the crown (4) to its ordinary position.
Three Hands head/Three Hands Square head/Three Hands Retro head
- • When the second hand (3) reaches the zero seconds position, pull the crown (4) to the right.
- • Turn the crown (4) to set the time. *
- • Set the time, then return the crown (4) to its ordinary position. *
Chronograph head/Solar head/Chronograph Classic head*The 24-hour hand (9) rotates in sync with the hour hand (2). Be careful to set the time correctly for a.m. or p.m.*To set the precise time, stop the second hand (3) at the zero seconds position, put the minute hand (1) four or five minutes beyond the correct time and then move it back to the right time.
Mechanical head
Refer to “Using a Mechanical Head” for setting the time with a Mechanical Head. - Chronograph head operation
-
Set the date with a chronograph model
・With a chronograph model, you can set the date.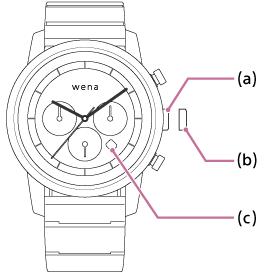
Chronograph
Chronograph Classic
- Pull the crown (a) to the date correction position (b).
- Turn the crown (a) leftward to set the date (c).The crown (a) spins freely when turned rightward.
- Return the crown (a) to its ordinary position.
In such cases, move the hands to a time outside that period to adjust the date.
The calendar cycle is 31 days. You must adjust the date to the 1st with the crown for months without 31 days. -
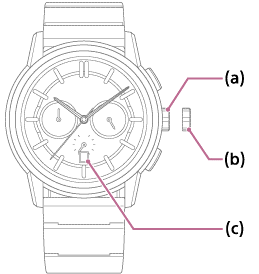
Using the stopwatch on the chronograph
You can use a stopwatch on the chronograph model.
It can count up to 59 minutes(a)and 59 seconds(b). After 59 minutes and 59 seconds, it returns to 00:00 and starts counting again.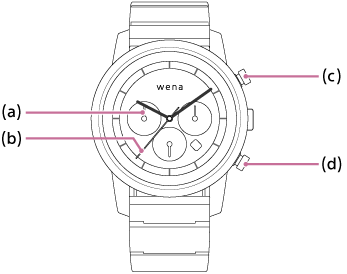
Chronograph

Chronograph Classic

- Press the stopwatch (start/stop) button (c) to start or stops the count
- Press the stopwatch (reset) button(d) to return the count to 00:00.
-
Setting the chronograph hands to the zero position (Chronograph model only)
If the chronograph second hand does not return to the zero second position after changing the battery or resetting the chronograph, or if the chronograph second hand is dislodged due to a strong impact, you must realign it to the zero position.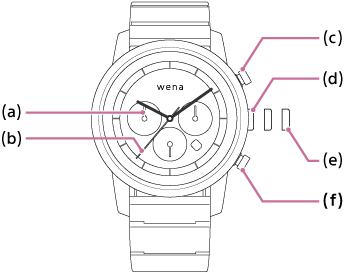
Chronograph
Chronograph Classic
- Pull the crown (d) to (e) position.
- Push the (start/stop) button (c) and set the chronograph stop watch second hand (b) to the zero position.
If you push and hold the stopwatch (start/stop) button (c), the chronograph second hand (b) will move more quickly. - Correct the time and move the crown back to its ordinary position.
- Press the stopwatch (reset) button (f).Check that the chronograph second hand (b) and the chronograph minute hand (a) are back to the zero position.
- Solar head operation
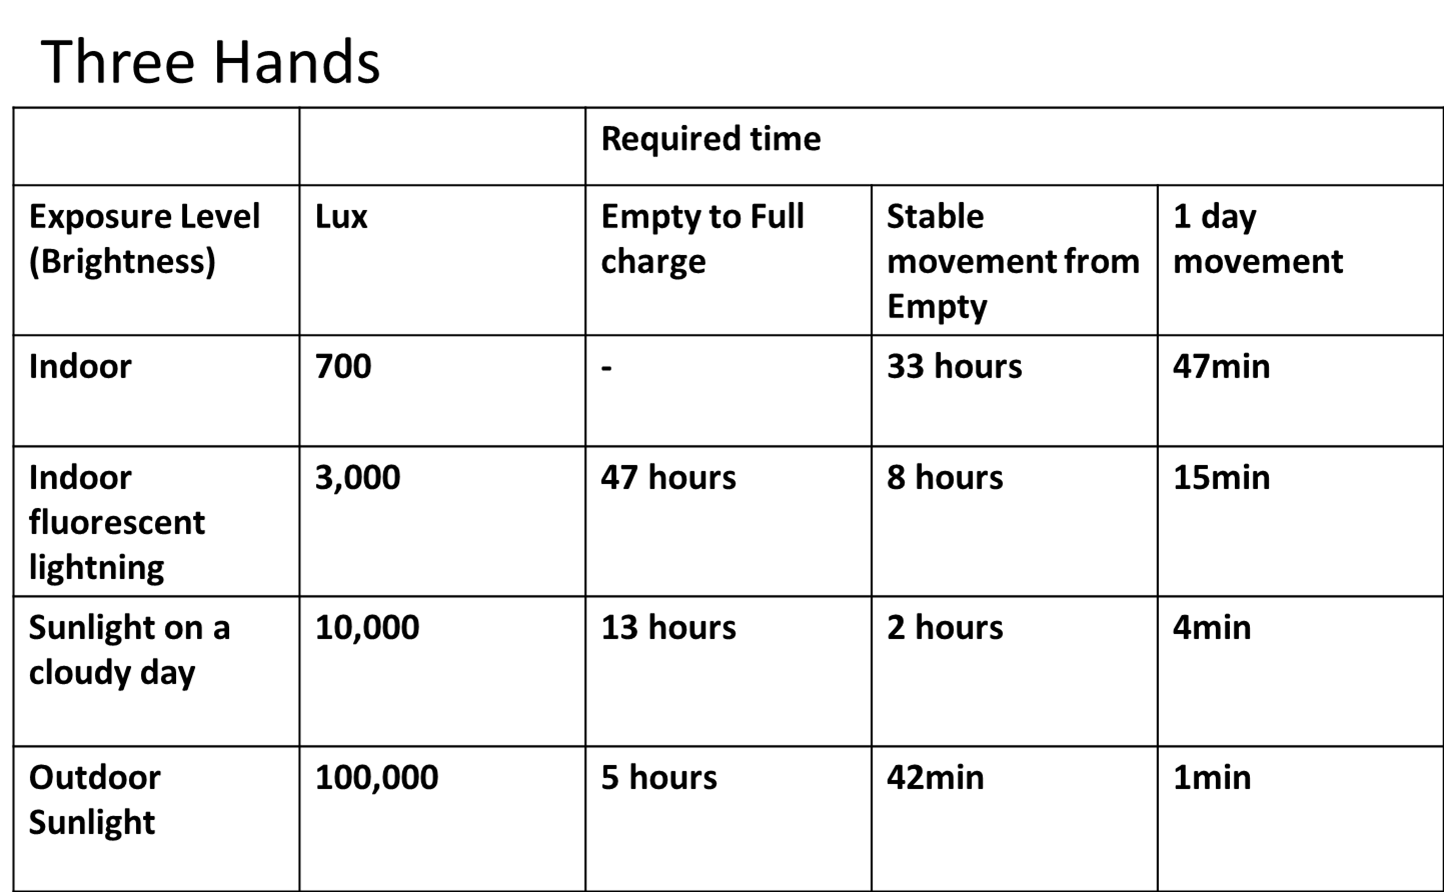
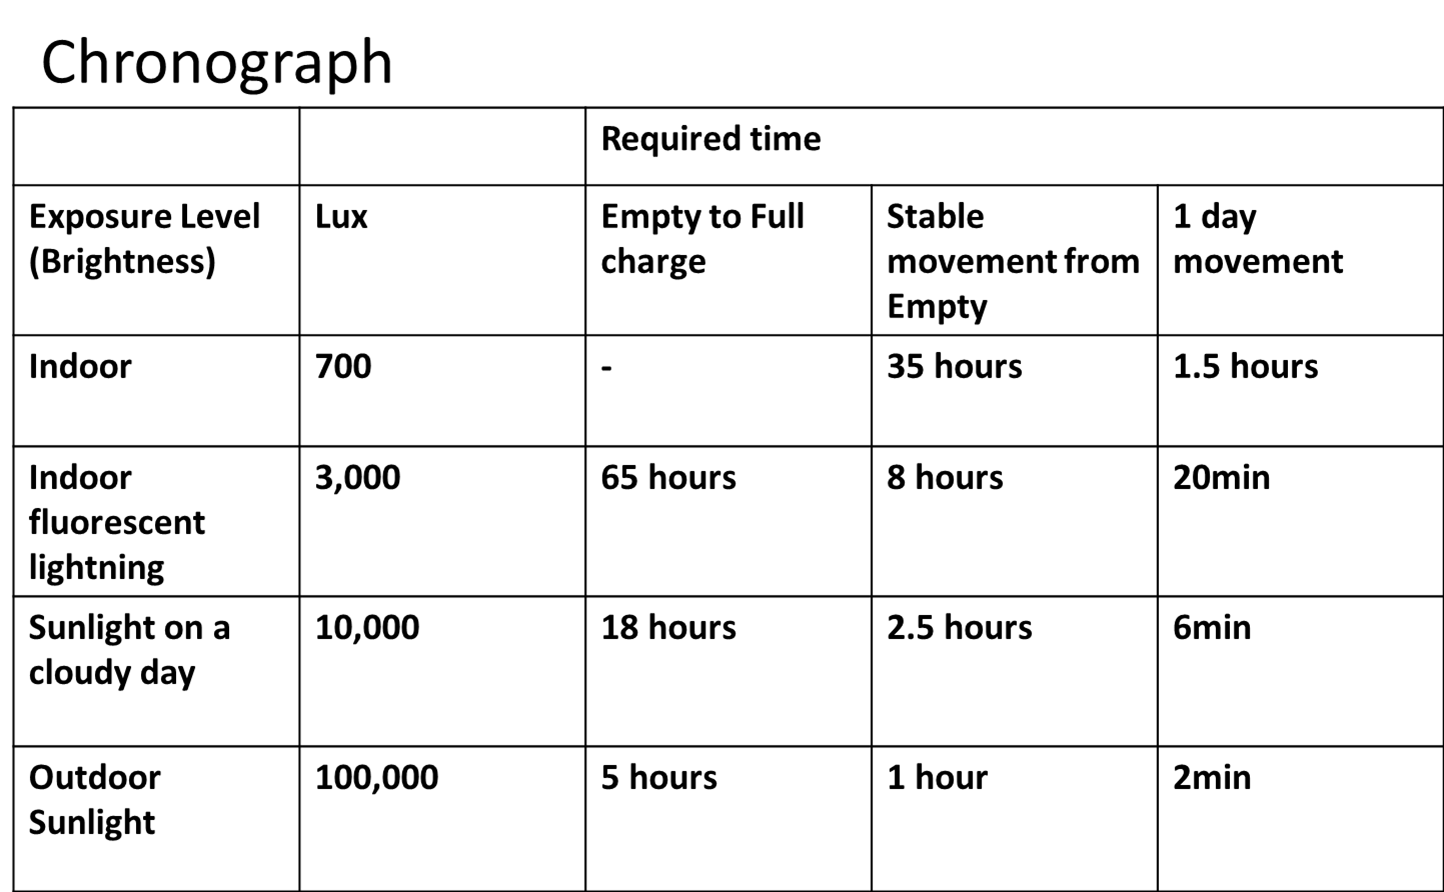
- • This device can be charged by direct sunlight on the watch face or by placing under fluorescent lights. Place it under light for the required charging times as below to maintain steady operation.
Required charging times depending on the surrounding environment
These are approximate required times for charging.
Notes
- • You cannot charge the solar head in dark places with no light.
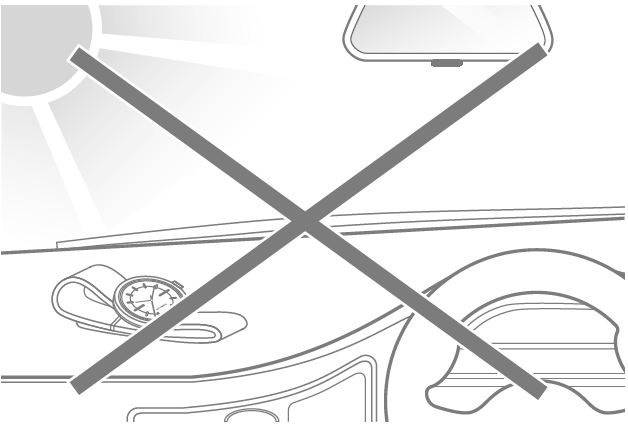
- • Charging in high temperatures may lead to failure of parts.
Avoid charging by placing it close to an incandescent light. - • Avoid leaving it on the dashboard of your car for a long time.
When the battery is insufficient, the second hand moves in increments of two seconds. When you notice this, place the watch face under light to charge. The watch head will stop working after the approximate times given below when the battery is insufficient.- • Three Hands model: approximately 1 day
- • Chronograph model: approximately 1 week
If the chronograph second hand does not return to the zero second position after resetting the chronograph, you must realign it to the zero position.- Pull the crown [4] to right two steps.
- Adjusting the chronograph minute hand [5]
If you push and hold the stopwatch (start/stop) button [7] for 2 seconds, the chronograph minute hand [5] will go around the dial once. Press the stopwatch (reset) button [8] to make the chronograph minute hand [5] move, and set it to the zero position. Push and hold to speed it up. - Adjusting the chronograph second hand [6]
Once you have corrected the chronograph minute hand, push and hold the stopwatch (start/stop) button [7] for 2 seconds.
The chronograph second hand [6] will go round the dial once.
Press the stopwatch (reset) button [8] to make the chronograph second hand [6] move, and set it to the zero position.
Push and hold to speed it up. - Correct the time and move the crown back to its ordinary position.
- Press the stopwatch (reset) button [8], and check that the chronograph second hand [6] and the chronograph minute hand [5] are reset to the zero position.
Set the date on a solar model- • Three Hands: pull the crown to right 1 step and turn it counterclockwise.
- • Chronograph: pull the crown to right 1 step >and turn it clockwise.
- Mechanical head
- • Mechanical Head is a self-winding hand-wound watch. The crown is a screw-lock type, so you must undo the screw lock prior to turning the crown. If you turn the crown counterclockwise to release the screw lock, you
can wind the spring. When you wind the spring fully, Mechanical Head will run for approximately 42 hours. After releasing the screw lock, you can pull the crown to right to adjust the time.
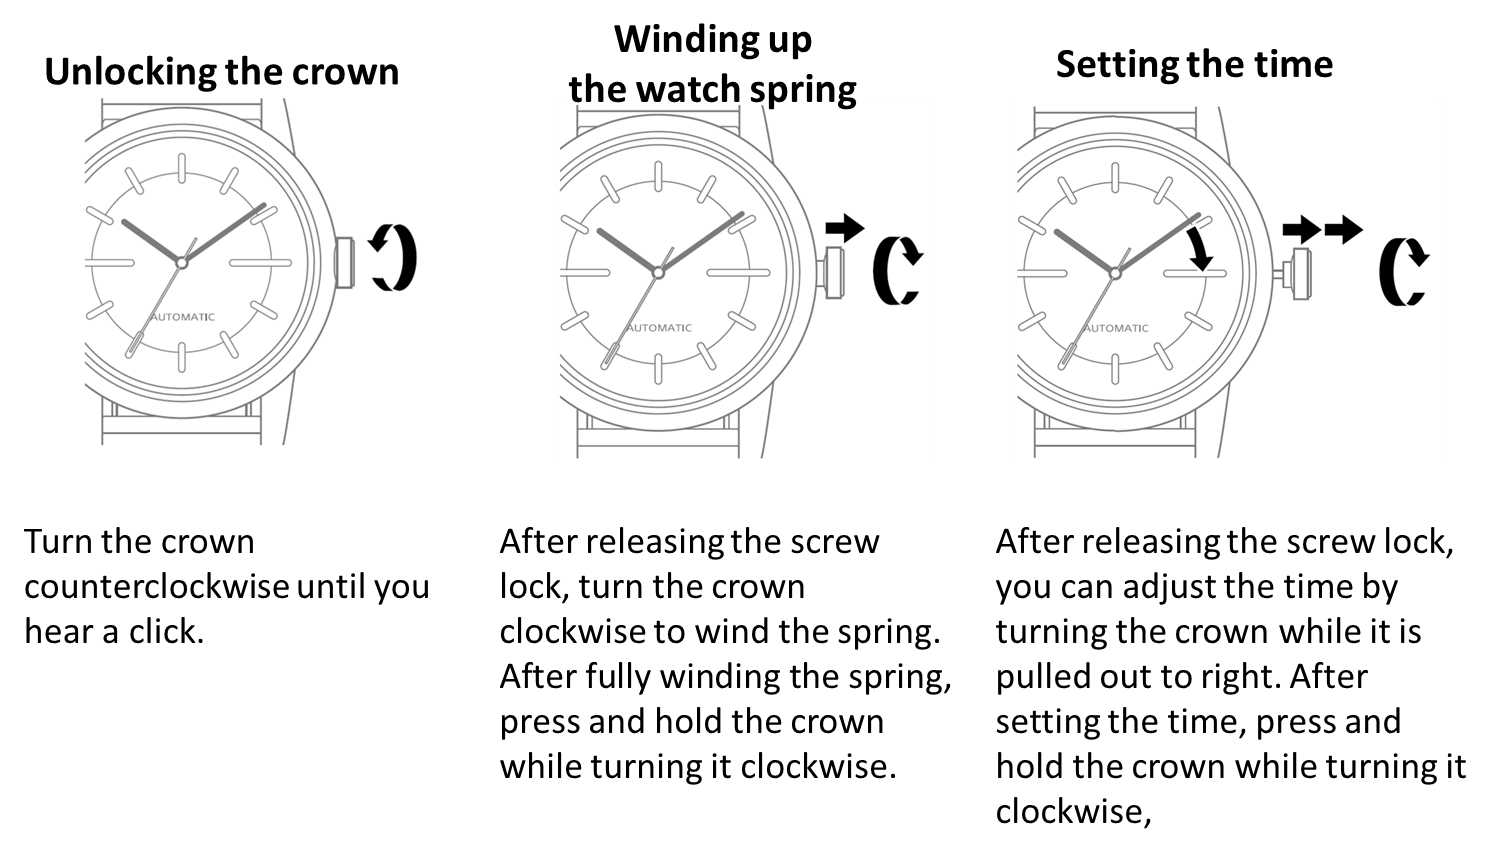 While you wear Mechanical watches on your wrist, the spring will be winded automatically through the movement of your wrist. If you do not often wear the watch, wind it manually by turning the crown.